Disks
Disks can be Hard Disk Drives (HDDs), Solid State Drives (SSDs), USB drives, virtual disks from a hypervisor or open LUKS mounts, or even sdcards. Rockstor supports and recommends whole disk btrfs (ie no partitions or partition table), but can also recognise and configure btrfs pool members in partitions; but this is not encourages. The recommendation to use whole disk btrfs pool members arises from the simplification afforded by removing the partition ‘layer’ all together. This way partition types, partition table types, sizes relative to whole disk, various limitations that exist on how many partitions of what type etc are all made irrelevant as each disk is simply and wholly a pool member and only a pool member. I.e. Keep it Simple and Straightforward (KISS).
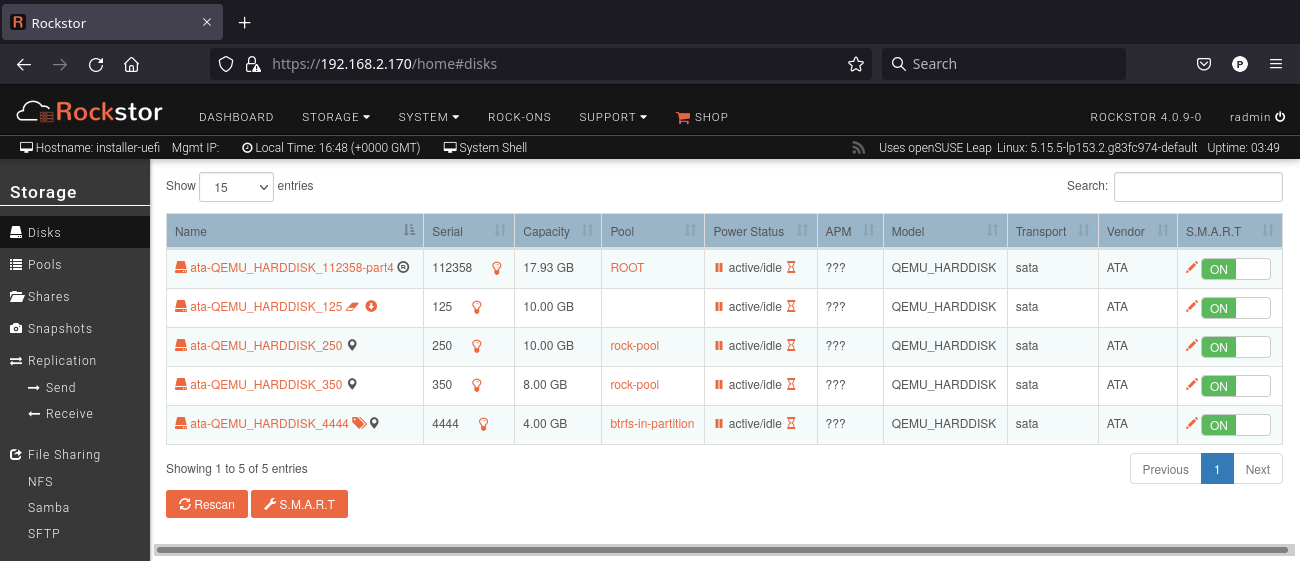
Disk related operations such as S.M.A.R.T monitoring, data importing etc. can be managed from the Disks page listed under the Storage tab of the Web-UI. This page is an overview of disks currently or previously known to the system and is essentially a table where each row is an entry for a single real or virtual drive. Previously attached drives that are no longer found to be attached are re-named to detached-<random-string>. Attached devices are named according to their boot to boot stable udev assigned by-id names (ie /dev/disk/by-id entries). All devices require and are tracked by their unique serial number which allows for consistent settings even when a disk is moved from one pool to another (via sequential pool Resize/Reraid operations).
The Disks Web-UI page:

The disks table can be sorted by individual columns by clicking the small up/down arrows displayed in each column header. With a large numbers of disks the table will be paginated and the current page number is displayed below the table along with Prev and Next buttons.
Table links from left to right:-
Drive ‘by-id’ Name - click see drive’s S.M.A.R.T / status.
Bulb Icon - flash drive’s activity light to identify its physical location.
Pool Name - click for Pools details page.
Pause Drive - request an immediate drive spin down (standby mode).
Hour glass - configure Drive Specific Spin Down Time given idle time, see: What is Idle Time.
S.M.A.R.T Pen Icon (Edit) - edit or Add Drive Specific Custom S.M.A.R.T Options.
S.M.A.R.T Switch - enable or disable for each device.
For more information on configuring drive power down related settings please see the Disk Power Down HowTo. Similarly please see the Disk Custom S.M.A.R.T Options section of the S.M.A.R.T HowTo for details of the functions provided by the S.M.A.R.T column entries.
Buttons:-
Rescan - the hardware for any supported drives, see Scan for Disk Changes below.
S.M.A.R.T - system wide custom configuration (advanced).
Scan for Disk Changes
Clicking the Rescan button forces an update of the Disk table. This is particularly useful if a drive has been added or removed since Rockstor was powered on i.e. hot plugged/unplugged. It is recommended that this action be taken just prior to removing detached devices to ensure the table contents is freshly updated.
Import BTRFS Pool
After having performed a Scan for Disk Changes any non Rockstor managed pools should be importable from any one of their Disk members, although if the chosen device member is a partition rather than a whole disk (as opposed to a whole disk partition) an additional step is required: that of Adding a Redirect Role.
The BTRFS Pool import procedure imports the following:-
Pools
Shares
Snapshots
This process is detailed in the following sub-sections: Import whole disk BTRFS, and Import BTRFS in partition.
Warning
During the pool import sometimes the imported shares’ ownership for user and group can revert back to the default root:root. Before proceeding with any other activities, for example a Rockstor system restore using a previously generated configuration backup file, ensure that the respective share user/group ownerships are set back to what they were before they were imported into the Rockstor installation. For how OpenSUSE handles default user and group assignment see Users and default group.
Import whole disk BTRFS
If after a Scan for Disk Changes or after Reinstalling Rockstor the system finds an existing whole disk BTRFS filesystem a small down arrow icon next to each pool member drive names will be visible. This down arrow can be used to import the btrfs filesystem, assuming all prior pool members are attached.
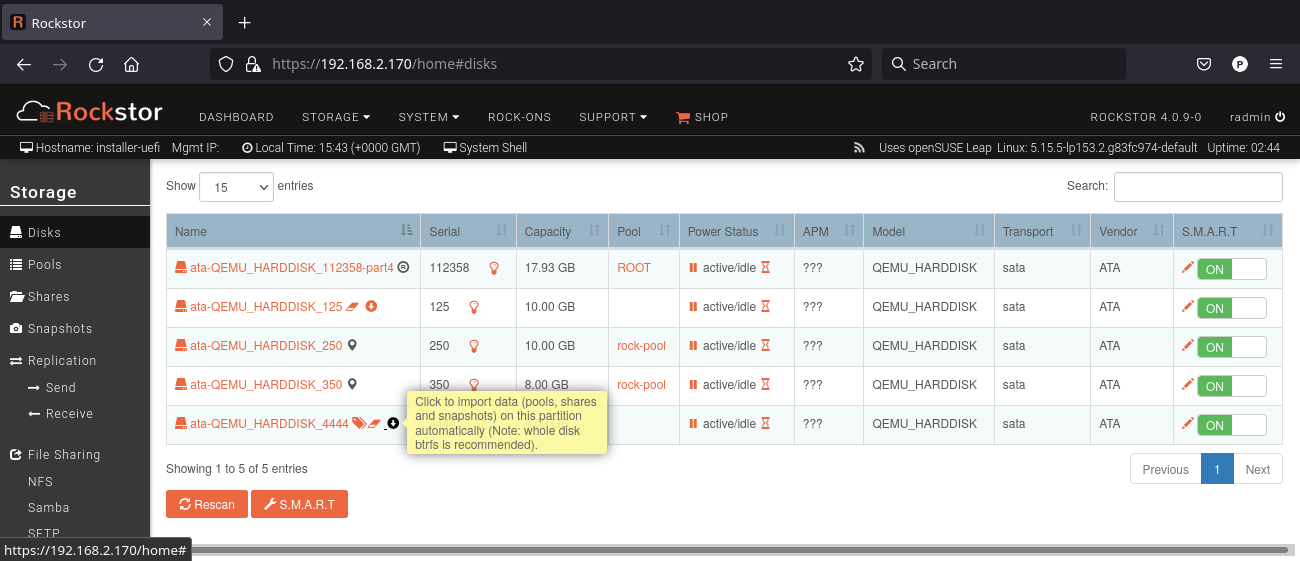
Here we see the disks page after a re-install to the system in the last image above. No pools have yet been imported.
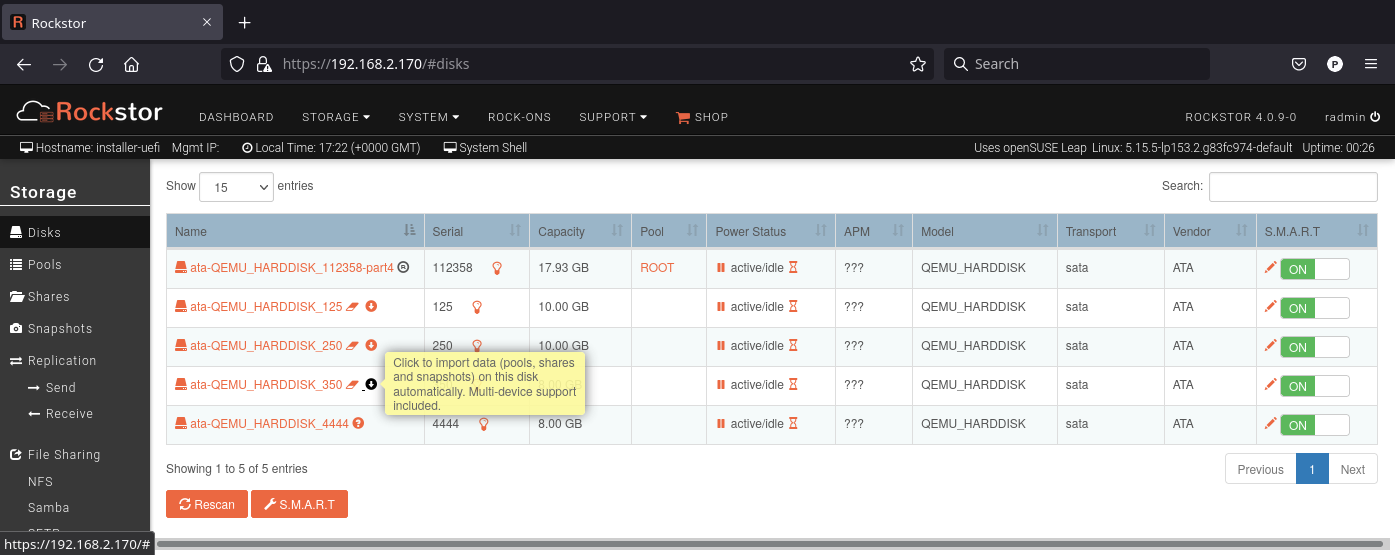
import icon mouse-over tooltip “Click to import data (pools, shares and snapshots) on this disk automatically. Multi-device support included.”
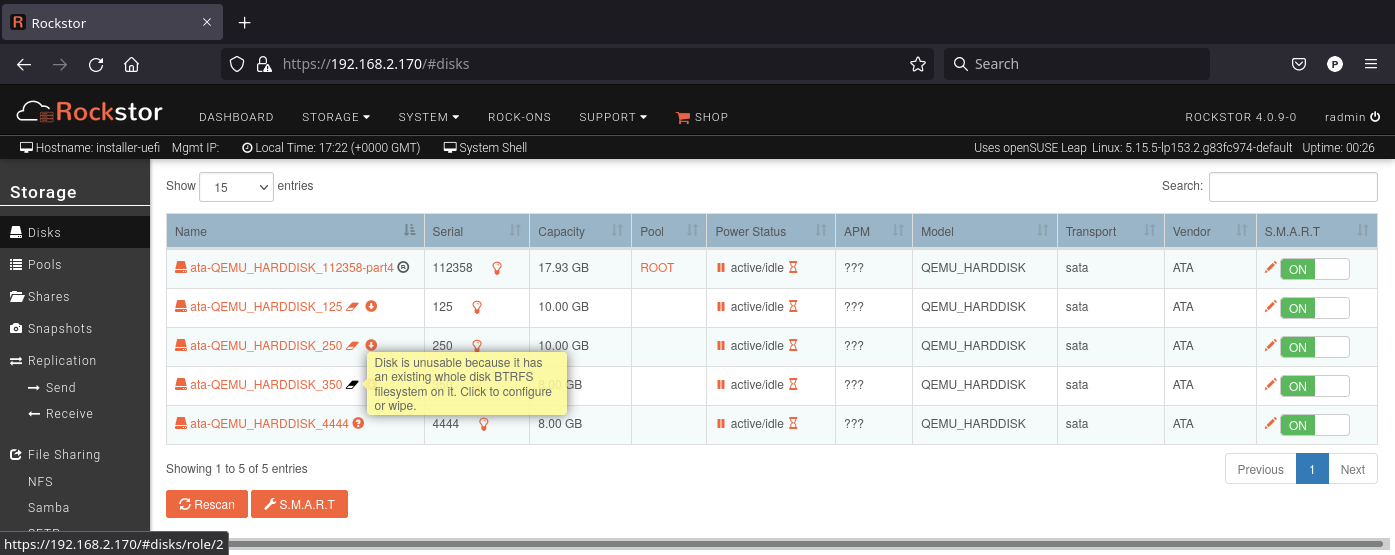
configure or wipe icon mouse-over tooltip “Disk is unusable because it has an existing whole disk BTRFS filesystem on it. Click to configure or wipe.”.
In this case we used the import (down arrow) option and there after the disk table is as follows:
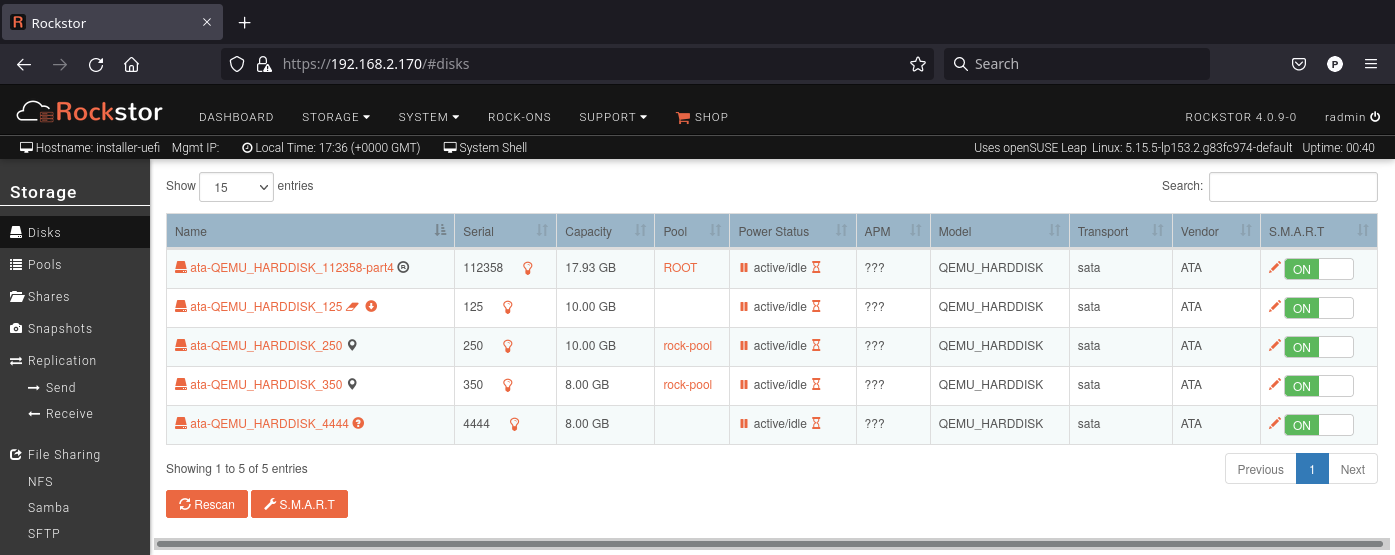
In the above we have now imported the prior multi-device pool via one of its members. This process can take from a few seconds to a minute or so, depending on pool size and share/snapshot count.
Note: Rockstor requires/uses btrfs labels. Imported pools are named after their respective labels.
Import unwell Pool
If a pool is unwell or degraded (missing members) before import, or otherwise requires a custom mount option then a special import procedure is required. Rockstor can only specify custom mount options after import, not before. The following is a work-around for this current limitation.
A Rockstor pool import first checks to see if a pool is mounted. If not then it will attempt a mount with the btrfs default options. So if we mount the pool by-hand, via the command line, at the usual Rockstor mount point, we can dictate our own custom mount options.
In the following we have a pool that refuses to mount rw, and has a pending balance that is aggravating our data recovery situation.
mkdir /mnt2/<pool-label-here>
mount -o ro,skip_balance /dev/disk/by-id/<a-pool-member-disk-name> /mnt2/<pool-label-here>
Use btrfs fi label /dev/disk/by-id/<a-pool-member-disk-name> to get the pool label.
A regular Web-UI pool import via the given pool member will now skip the default mount step. After the import the Web-UI can then be used to enact the same Mount Options on subsequent mounts, if required. And facilitate refreshing backups, remounting rw, / Pool Resize/ReRaid / Scrubbing a Pool etc.
Note
In some extreme case it can be required to specify all member devices to achieve a mount.
If so add to the ro,skip_balance all the devices like so:
ro,skip_balance,device=/dev/member1,device=/dev/member2.
You will still need to specify one of these again as the next mount option.
Note also that other mount options can similarly be added if required:
i.e. such as degraded if not all prior members are available.
Import BTRFS in partition
Rockstor can also import pools with btrfs-in-partition members (although whole disk is strongly recommended as this is a simpler arrangement). If at least one pool member is a whole disk btrfs (no partition table) then the above Import whole disk BTRFS method can be used on this whole disk member. But if all pool members are partitions then a manually applied ‘redirect role’ will be required on one of the pool members in order to enable the import icon on that member. During the import all other partitioned members of the pool will have their required redirect roles applied automatically.
An as-yet un-imported pre-exiting btrfs-in-partition disk, with no redirect role, will have a gear/cog icon.
gear/cog icon tooltip “Disk is unusable as it contains partitions: one of which has an existing BTRFS filesystem on it. A User Assigned redirect role is required prior to import. Click to configure or wipe.”
Please see Adding a Redirect Role in the Disk Role Configuration section to enable / activate the import icon for a partitioned pool member.
N.B. Rockstor supports only one btrfs partition per device and is not compatible with any LVM configuration. Whole disk btrfs (no partition table) is strongly recommended.
Disk Role Configuration
Disk roles are not required and are not advised for general purpose disk use. They are intended as a way to label individual disks for a specific use. Examples of such uses are documented on the configuration page:
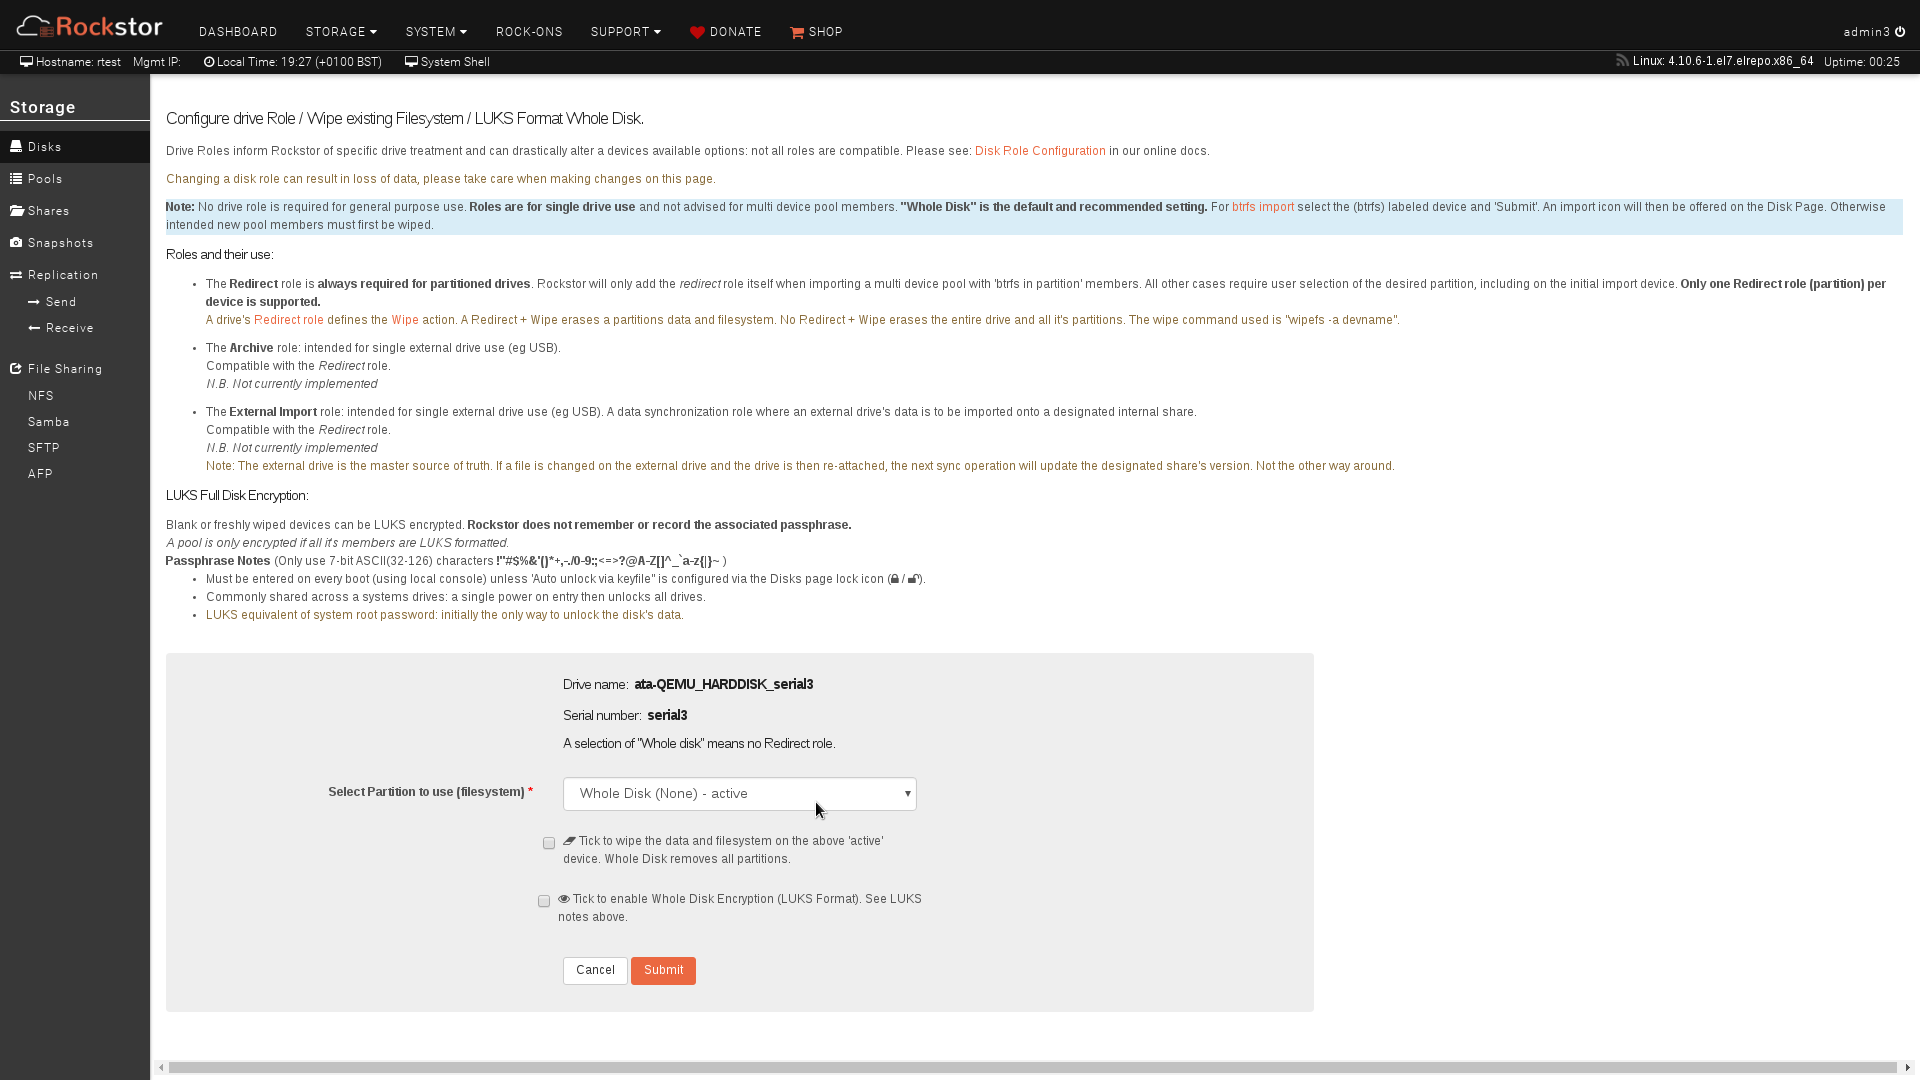
The disk role configuration page: Configure drive Role / Wipe existing Filesystem / LUKS Format Whole Disk.
N.B. Currently the only implemented role is The Disk Redirect Role
The Disk Redirect Role
Quoting from the configuration page:
“The Redirect role is always required for partitioned drives. Rockstor will only add the redirect role itself when importing a multi device pool with ‘btrfs in partition’ members. All other cases require user selection of the desired partition, including on the initial import device. Only one Redirect role (partition) per device is supported.
A drive’s Redirect role defines the Wipe action. A Redirect + Wipe erases a partitions data and filesystem. No Redirect + Wipe erases the entire drive and all it’s partitions. The wipe command used is “wipefs -a devname”. “
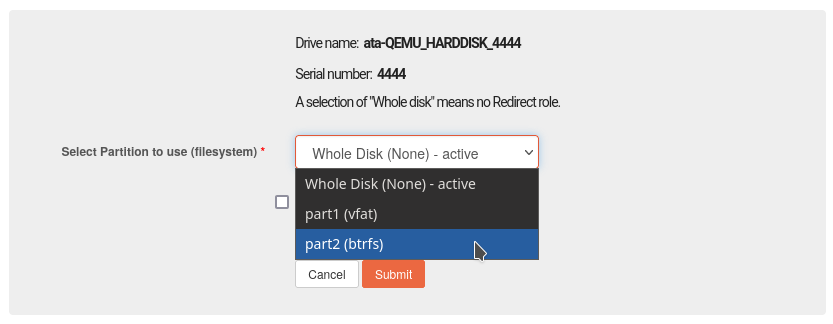
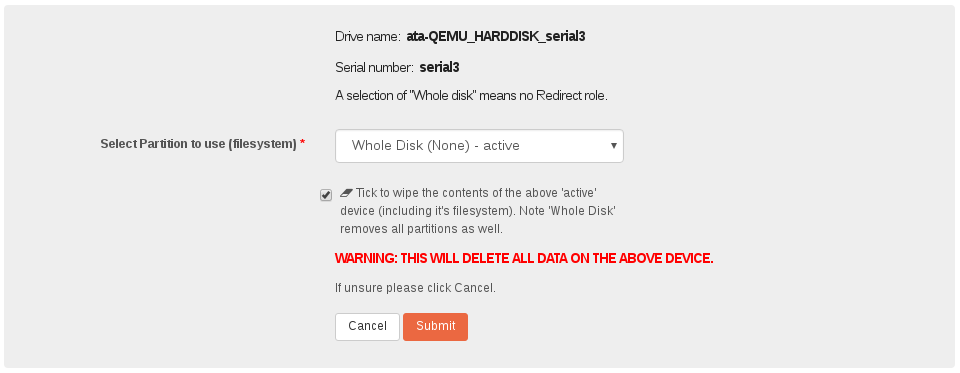
The Redirect role is essentially a pointer to the partition one wants to use on a disk instead of using the whole disk (whole disk is recommended). No Redirect role (default) means “use whole disk”. The Select Partition to use option indicates the current setting by adding an active to that entry.
Examples of “Select Partition to use” entries and their explanation:
Whole Disk (None) - active means no redirect role and (None) means no whole disk filesystem found.
part2 (btrfs) - active an active redirect role to partition number 2 (btrfs filesystem).
Note that there is only ever one active entry at any one time.
Please note that there are some restrictions / safeguards in place that relate to devices containing a btrfs formatted partition. In this circumstance it is only possible to redirect to the btrfs partition; all other partition redirect requests will be blocked with the following warning message in red:
“Existing btrfs partition found; if you wish to use the redirect role either select this btrfs partition and import/use it, or wipe it (or the whole disk) and then re-assign. Redirection is only supported to a non btrfs partition when no btrfs partition exists on the same device.”
Also note that once a redirect role to a btrfs partition has been established it is by design that it cannot be changed to another partition until the btrfs filesystem in that partition is wiped; either via a Resize/ReRaid - remove disk operation if it is a member of a pool, or by simply wiping it in the Disk Role Configuration page if it is not associated with any Rockstor managed pools. In this case the warning message in red is:
“Active btrfs partition redirect found; if you wish to change this redirect role first wipe the partition and then re-assign. Redirection is only supported to a non btrfs partition when no btrfs partition exists on the same device.”
See also related wipe restrictions towards the end of the Wiping a Partition or Whole Disk section.
Adding a Redirect Role
Rockstor has an ability to work with existing partitioned devices, however the strong recommendation is to use whole disks. But where this is specifically not desired or is otherwise unavoidable then a simple mechanism is available to allow the use of a single partition per disk (system disk not included). This covers most use cases and is a design decision intended to keep configuration simple.
If a disk has a partition table, it is suspected to have data and Rockstor doesn’t allow it’s use until a single partition is chosen (via a Redirect Role); or the partition table is explicitly wiped (removing all partitions and their contained data from the entire disk) and the disk is then usable in the preferred “Whole Disk” no redirect role mode.
Prior to configuration, partitioned disks are displayed with a little gear/cog icon next to their name:
gear/cog icon configure or wipe mouse-over tooltip “Disk is unusable as it contains partitions and no User Assigned Role. Click to configure or wipe.”
N.B. a variation of this ‘gear/cog icon’ mouse-over tooltip text occurs if any of the exiting partitions are found to be un-imported btrfs members. See the above Import BTRFS in partition section for more details and the mouse-over tooltip text in this case.
In either case clicking on this gear/cog icon opens the Disk Role Configuration screen:
In the following we return to the Import BTRFS in partition example. Our contrived externally generated single disk btrfs-in-partition example was created as follows:
partitioning (1/2 fat32 & 1/2 linux partition types):
parted -a optimal /dev/disk/by-id/ata-QEMU_HARDDISK_4444
mklabel msdos
mkpart primary fat32 1 50%
mkpart primary ext2 50% 100%
quit
formatting (fat32 & btrfs volume/pool):
mkfs.fat -s2 -F 32 /dev/disk/by-id/ata-QEMU_HARDDISK_4444-part1
mkfs.btrfs -L btrfs-in-partition /dev/disk/by-id/ata-QEMU_HARDDISK_4444-part2
The prior ready for allocation ? icon is replaced by a gear/cog icon indicating the need for a redirect role. Our contrived example has only one member and it is in a partition. This by-hand (command line) configuration is not Rockstor native. Whole disk (no partition table) is strongly recommended and Rockstor has no build-in partitioning capability. But via a redirect role an import, in this contrived example, is possible.
In this image we see the drop down selector with the default of whole disk:
And once selected but not yet submitted (i.e. no “- active”) we have:
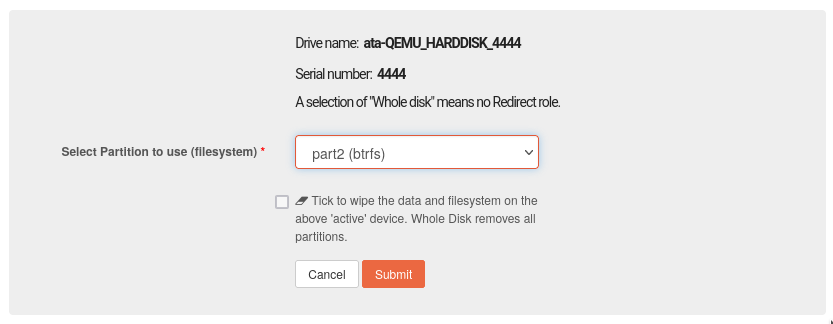
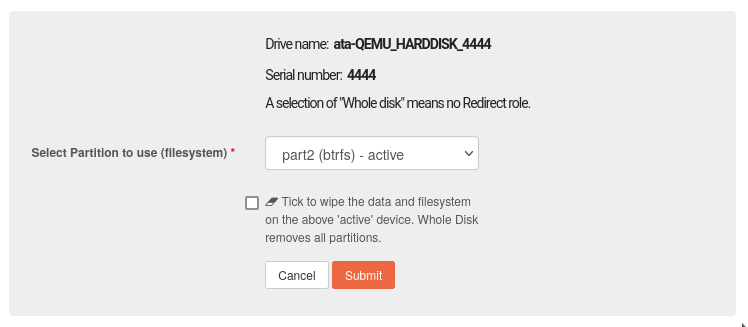
We Submit this Redirect role in order to activate it. Rockstor now has confirmation to use this particular partition and as seen in the previous image, it contained a btrfs filesystem.
The affected disk entry then looses it’s gear/cog icon and gains:
The generic role tags icon, with partition aware text. If this was not a partitioned device the icon would be a single tag, indicating a whole disk role (whole disk roles are a pending feature).
Role tags icon mouse-over tooltip “User Assigned Role found on partitioned disk, click to edit.”
The generic eraser wipe icon, with partition aware text:
eraser wipe icon mouse-over tooltip: “Partition is unusable because it has an existing BTRFS filesystem on it. Click to configure or wipe.”
The generic import icon, with partition aware text:
import icon mouse-over tooltip: “Click to import data (pools, shares and snapshots) on this partition automatically (Note: whole disk btrfs is recommended).”
The options now available mirror those of an existing as yet un-imported whole disk btrfs member: as seen in the Import whole disk BTRFS section: ie either import from, or wipe, the active selection.
The only difference from a whole disk btfs, pre-import, is the Role tags icon.
Clicking on either the Role tags or the erase icon will display the same Disk Role Configuration page, where the current “active” setting for this partition redirect role is displayed.
If a redirect role is configured to a non btrfs partition then no import or wipe icons are displayed. And once imported the same is true for a btrfs-in-partition disk:
In the above the btrfs-in-partition filesystem created outside of Rockstor was purposefully labeled “btrfs-in-partition” to aid in this example.
Note: Rockstor requires btrfs labels and will name imported pools by the label found during the import process.
Wiping a Partition or Whole Disk
If not importing data from a pre-existing filesystem on a whole disk or in a partition it is recommended that each device first be wiped. This will remove all data and filesystem indicators on the wiped device; or in the case of a whole disk wipe, all partitions and the partition table as well.
N.B. When reusing a partition it is the users responsibility to ensure that the partition type is correct for the intended use. For btrfs-in-partition this would be type ext2 (83 Linux). When using the recommended default of “Whole Disk” this caveat/complication is irrelevant as there will be no partitions or a partition table.
Whole Disk should not to be confused with a partition that occupies the whole disk.
Btrfs can use a raw device directly; removing a myriad of complexities.
All partition or whole disk wiping is accomplished from the Disk Role Configuration screen and only an active selection can be wiped. If a partition or whole disk entry is not active, first select it and Submit this selection, this will change the “active” selection. Note that changing the “active” selection of a device can cause data loss so please consider this action carefully and read the configuration page warnings before proceeding. In the case of btrfs-in-partition some safeguards are in place and appropriate warning messages will indicate their presence: consequently there are restrictions on what can be done and in what order.
One such restriction is that only non Rockstor managed btrfs pool members can be wiped. If any device forms part of a Rockstor managed btrfs pool, attempts to wipe the device will be rejected with the following message in red:
“Selected device is part of a Rockstor managed pool. Use Pool Resize/ReRaid to remove it from the relevant pool which in turn will wipe it’s filesystem.”
So it is first necessary to either remove the device from it’s pool or delete the entire pool before it’s members can be wiped. This is to avoid accidentally deleting a pool member.
Note the accompanying RED WARNING that appears once the erase icon tick is selected.
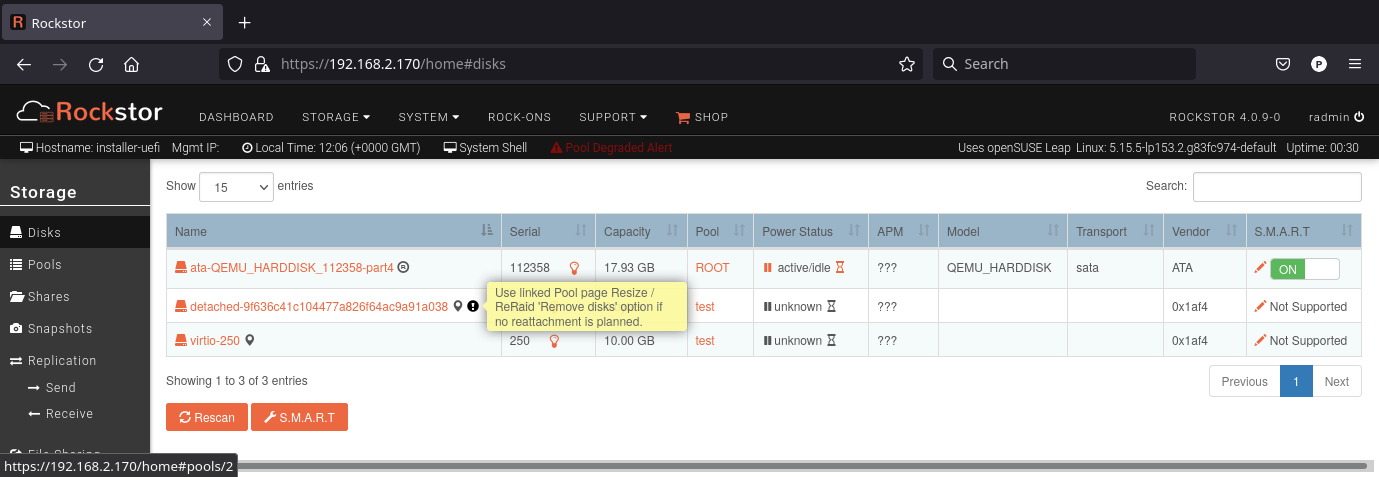
Detached Disks
Rockstor detects when a device goes offline (dead or detached from the system) and marks it as such by changing it’s name to:
detached-<long-random-string>
The serial numbers of such devices, Rockstor’s canonical disk reference, are maintained. This is critical to identifying the problematic device without ambiguity.
Pool Associated
Detached/missing disks generate Pool level warnings i.e Pool Degraded Alert in the Web-UI header, and (SOME MISSING) references within the affected pools overview and details page disk sections. An affected Pool’s details page will also show a Maintenance required advice section regarding recovery in this situation:
adding the ro,degraded mount options to allow the refreshing of backups - assuming a redundant profile was used.
switching to rw,degraded to allow for the removal of this detached/missing disks Pool association.
While simultaneously displaying the current mount/repair options/status (page refresh often advised). Also note that in some cases, i.e. after importing a poorly pool via a degraded option where Rockstor has never seen the missing disk, the following link text is shown “Delete a missing disk if pool has no detached members.”. This serves the exact same purpose as removing a known disk but will remove the first ‘missing’ member. The link server as a work-around for the situation where Rockstor has no knowledge of the disk specifics. In all other cases it is more intuitive to remove a named/known detached member.
In the following we see the normal map-pin/info icon associated with Rockstor managed pool members, and the additional detached exclamation mark indicator.
The following details the respective mouse-over tooltip text for the detached disk’s icons.
detached map-pin/info icon mouse-over tooltip “Drive is a detached member of a Rockstor managed Pool”
detached exclamation mark icon mouse-over tooltip “Use linked Pool page Resize / ReRaid ‘remove disks’ option if no reattachment is planned.”
The exclamation mark links to the Pool Resize/ReRaid section within the Web_UI. From there it’s pool association/membership can be removed via the ‘remove disks’ option. Although in some situation a re-raid (raid level change) may be required before a disk can be removed. This is primarily required where removing a disk, detached or otherwise, would reduce the member count below the minimum for the current btrfs raid level.
If you wish to remove a disk from a pool, or change the pools raid level, then please see Pool Resize/ReRaid in the Pools section.
Non Pool Associated
Detached drives with no Rockstor managed Pool association gain a bin/trash icon next to their ‘detached’ name. This icon has the following tooltip text:
detached bin/trash icon mouse-over tooltip “Disk is unusable because it is detached. Click to delete it from the system if it is not to be reattached.”

Clicking on the trash icon brings up a confirmation dialog. Upon confirmation, the disk will be removed:
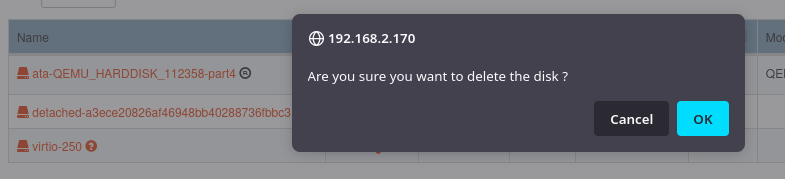
It is important to note that removing a detached disk, pool associated or not, should only be carried out if the disk in question is not to be re-attached. Otherwise all associated data and settings for this drive will be lost
