Pools
A Pool in Rockstor is a set of disk drives combined and represented as a single volume. Pools have attributes such as redundancy profile and compression to safeguard and store data efficiently. Pools can be expanded or shrunk by adding or removing disk drives. In other words, a Pool is a single or multi device BTRFS filesystem.
Pool related operations can be managed from the Pools screen listed under the Storage tab of the Web-UI.
Creating a Pool
Whole disks (un-partitioned) drives are very much preferred as Rockstor Pool members.
See Import BTRFS Pool to re-establish a prior Rockstor installs Pool. It may also be possible to import similarly structured btrfs volumes, single or multi member.
Click on Create Pool button and submit the create pool form to create a pool. There is a tooltip for each input field to help you choose appropriate parameters.
Redundancy profiles
All standard BTRFS redundancy profiles are available when creating a pool.
Warning
Please see The nature of btrfs to avoid some surprises regarding the way btrfs does raid.
Note
No btrfs-raid profile requires that its member disks be matched in size. But in the case of btrfs-raid0 particularly, the available space is maximised if they are similar, or ideally the same.
- Single: This profile offers no redundancy.
A single disk failure will result in the entire Pool being lost. It is the only valid option for creating a Pool with a single disk drive. It is also recommended if you have multiple disks of very different sizes, yielding higher total capacity compared to Raid0 in this setting.
- Raid0: This profile offers no redundancy.
A single disk failure will result in the entire Pool being lost. Two or more disks are required for this profile. It is recommended only when there is no need for redundancy, and offers better performance than the Single btrfs-raid option. Both data and metadata are striped across the disks. It is recommended for same/similar size disks. If you have very differently sized disks and no need for redundancy, the Single profile provides higher capacity.
- Raid1: Two or more disks are required for this profile.
This profile can sustain a maximum of one disk failure. Data and metadata are replicated on 2 independent devices, irrespective of the total pool member count.
- Raid5: Two or more disks are requried for this profile.
This profile can sustain a maximum of one disk failure. Uses parity and striping. The BTRFS community consensus is that btrfs-raid5 is not yet fully stable and so is *not recommended for production use*.
- Raid6: Three or more disks are requried for this profile.
This profile can sustain a maximum of two disk failures. Uses dual-parity and striping. The BTRFS community consensus is that btrfs-raid6 is not yet fully stable and so is *not recommended for production use*.
- Raid10: Four or more disks are required for this profile.
This profile can sustain a practical maximum of one disk failures. Uses a Raid0 (strip) of Raid1 mirrors. Btrfs-raid 10 offers the best overall performance with single disk redundancy.
Please see the btrfs wiki for up to date information on all btrfs matters.
For a BTRFS features stability status overview, including redundancy profiles, visit the btrfs wiki status page.
Warning
As of Rocksor v4 “Built on openSUSE” Leap 15.3 base, the far younger parity raid levels of 5 & 6 are read-only by default. Write access can be enabled by Installing the Stable Kernel Backport: advanced users only. See also our Btrfs raid1c3 raid1c4 doc section on the same page.
Compression Options
Compression can optionally be chosen during Pool creation or it can be set on a previously created Pool. In the latter scenario, compression is applied only to data written after it’s set.
Compression can also be set at the Share level. If you don’t want to enable compression for all Shares under a Pool, don’t enable it at the Pool level. Instead, selectively enable it on Shares.
Besides not enabling compression at all, there are two additional choices
zlib: Provides slower but higher compression ratio. You can find out more from zlib.net.
lzo: A faster compression algorithm but provides lower ratio compared to zlib. You can find out more from oberhumer.com.
Mount Options
These are optional and meant for more advanced users to provide BTRFS specific mount options. Since a Pool is a filesystem, it is mounted with default options which can be altered by providing one or more of the following. You can find out more about each option from the BTRFS documentation mount options section.
alloc_start
autodefrag
clear_cache
commit
compress-force
degraded
discard
fatal_errors
inode_cache
max_inline
metadata_ratio
noacl
noatime
nodatacow
nodatasum
nospace_cache
nossd
ro
rw
skip_balance
space_cache
ssd
ssd_spread
thread_pool
Pool Resize/ReRaid
A convenience feature of btrfs Pool management is the ability to add or remove disks, and change redundancy profiles, while still using the Pool. The persistence of a pool’s accessibility is otherwise known as it’s ‘online’ state. And so these changes are referenced as it’s online capabilities.
A performance reduction is expected during any changes of this sort, but depending on your hardware overhead, this can be unnoticeable.
Note that increases in; disk count, percent usage, snapshots count, and Pool size can all impact on the memory and CPU required, and the time for any changes to be enacted.
Pool Resize / ReRaid may be done for the following reasons.
Change redundancy profiles. E.g. from btrfs RAID10 to btrfs RAID1. See Redundancy profile changes.
Add disks and increase capacity. See Adding Disks.
Remove disks and decrease capacity. See Removing Disks.
The following is the first page of the Resize/ReRaid wizard:
Redundancy profile changes
You can change Redundancy profiles online with only a few restrictions.
The resulting pool must have sufficient space for the existing data.
The target drive count will be sufficient for the target btrfs raid profile.
Rockstor can simultaneously change btrfs-raid levels while Adding Disks, but NOT while Removing Disks.
Because of (3.) above, when removing for example a drive from a pool which is already at the minimum drive count, attached or detached, we have to first change the raid level of that pool. A better approach is to instead add a disk, then remove the problem/detached/missing one. But this is not always an option and the following example serves to show both raid level change and detached disk removal.
Pool has below minimum members
This situation is most common in non industrial DIY setups where a pool will often have only the minimum number of disks.
In the following example we have a btrfs-raid1 Pool (minimum 2 disks) that has a detached/missing member. We have already refreshed our backups via the suggested ro,degraded mount; from the Pool details maintenance section that appeared. And we have then switched to a rw,degraded mount to allow for the Pool changes.
A degraded mount option is required when there is a detached/missing disk; irrespective of drive count and btrfs-raid level. Otherwise any mount operation is refused. The intention of the obligatory ‘degraded’ option is to ensure conscious intervention during an enhanced data loss state. And a Pool may well go read only on it’s own, by design, shortly after loosing access to one of it’s members. Again this is a data loss prevention tactic. Continuing to write new data to a degraded pool incurs a progressively increasing risk of data loss.
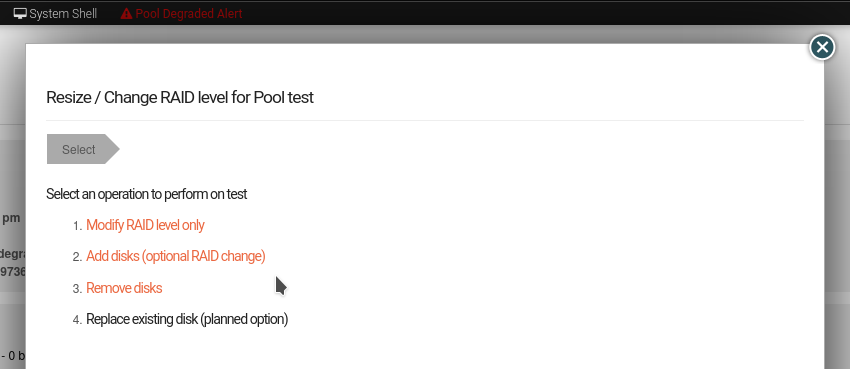
Following on from the last image of the first page of the Resize/ReRaid wizard, if we selected Remove disks.
We would receive the following error:
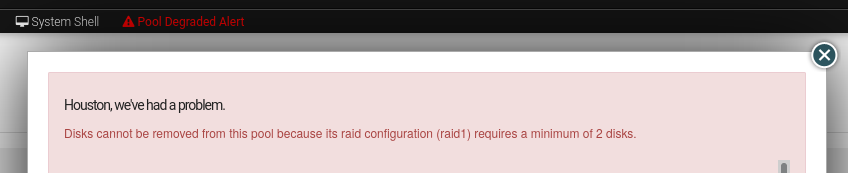
So we must first change this Pool’s btrfs raid level to one that can sustain our examples target single disk count. This leaves only btrfs raid single. Note that we would not need this additional risky step if we were not running our raid 1 with it’s minimum disk count. Then if/when the first disk died/became unusable, we could simply select the Remove disk wizard option and still be within the 2 disk minimum for our raid level. Extra steps are considered risky as it stresses the remaining disks when on of their kin has recently died. Often drives are of a similar age and wear level so this may not bode well for the remaining pool members.
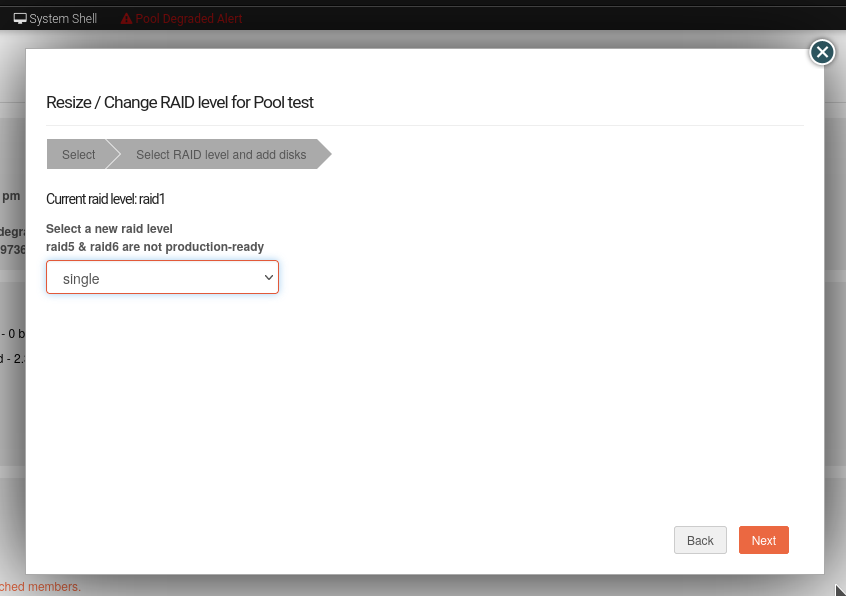
So we must, in this example case, select Modify RAID level only. And then select “Single” from the dropdown.
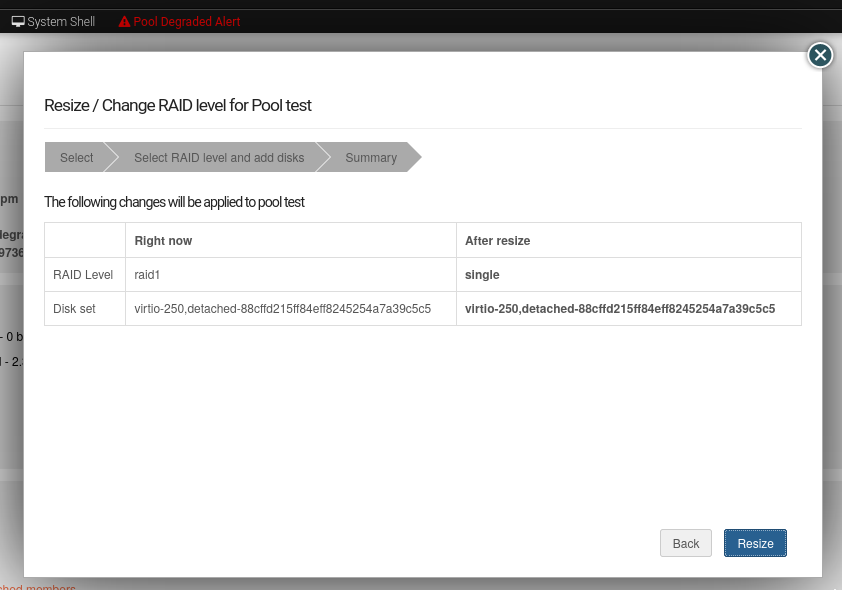
We are then presented with the proposed actions to be taken:
And if all looks to be as intended, and we Resize (which also means ReRaid), We are presented with the wizard complete dialog:
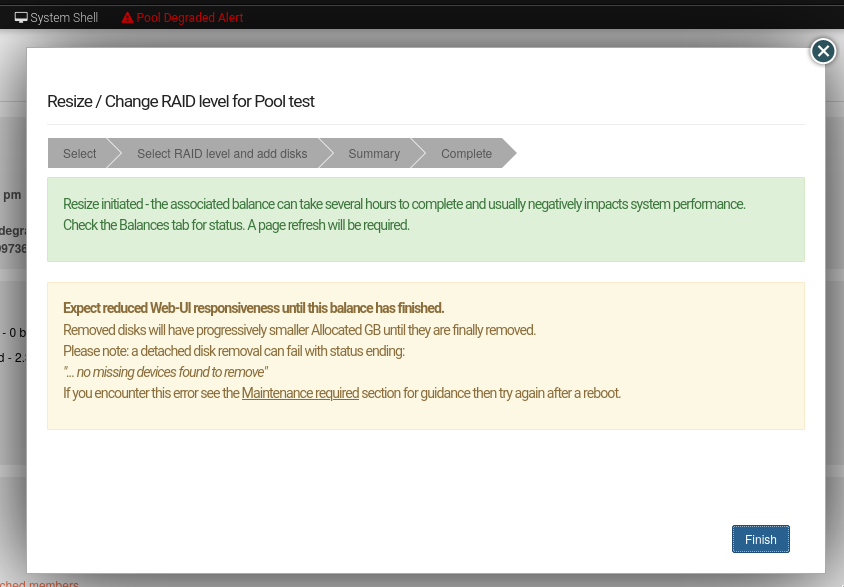
Which warns of the expected potential performance hit during the operation, and that the operation, depending on many factors, can last many hours to complete.
Once this re-raid operation is complete, indicated by the new Raid configuration: entry in the pool details page, we can remove our detached disk. As we are now no longer restricted by our prior raid level and it’s associated 2 disk count minimum. Again this raid level change would not have been required if we had not run our Pool at it’s minim disk count for it’s raid level.
Adding Disks
Disks of any size can be added, online, to an existing Pool. The same Resize/ReRaid operation can also change the current btrfs raid level. Combining both operations can result in a reduction of available storage, but this is usually the exception.
Removing Disks
Disks can be removed from a Pool, online, similar to adding Disks. But unlike when adding disks, Rockstor cannot change raid levels in the same Resize/ReRaid operation. Given the above removing a disk always results in a reduced Pool capacity. As such this operation can succeed only if the resulting capacity is greater than the current usage. And if the resulting member count is not taken below the minimum for the btrfs raid level and mount options.
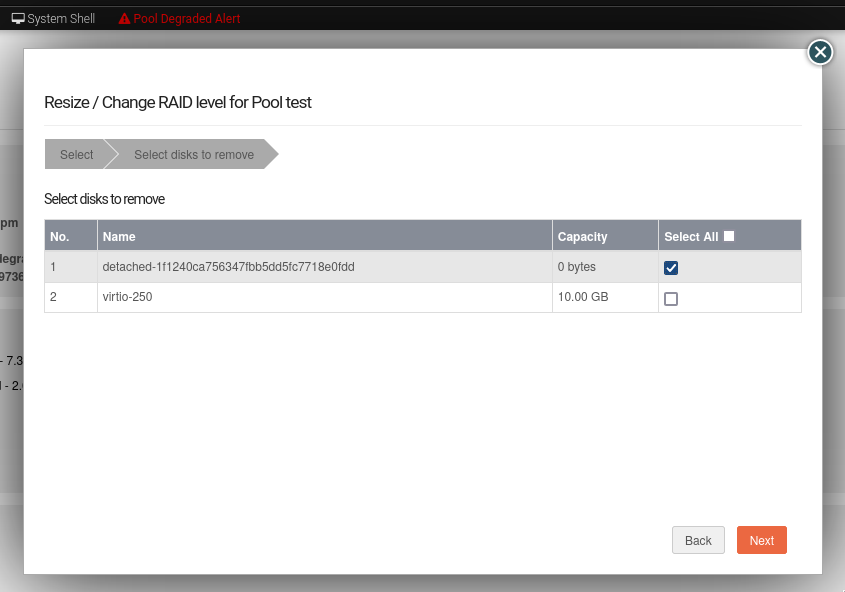
In the following we have a btrfs single raid level pool with a detached disk we wish to remove. This is a convenient follow-on from the example used in the earlier Redundancy profile changes.
From the first page of the Resize/ReRaid wizard indicated in the earlier Pool Resize/ReRaid section, we select (this second go around) the Remove disks option. This gives the following disk member selection dialog; in this example we have selected our detached member:
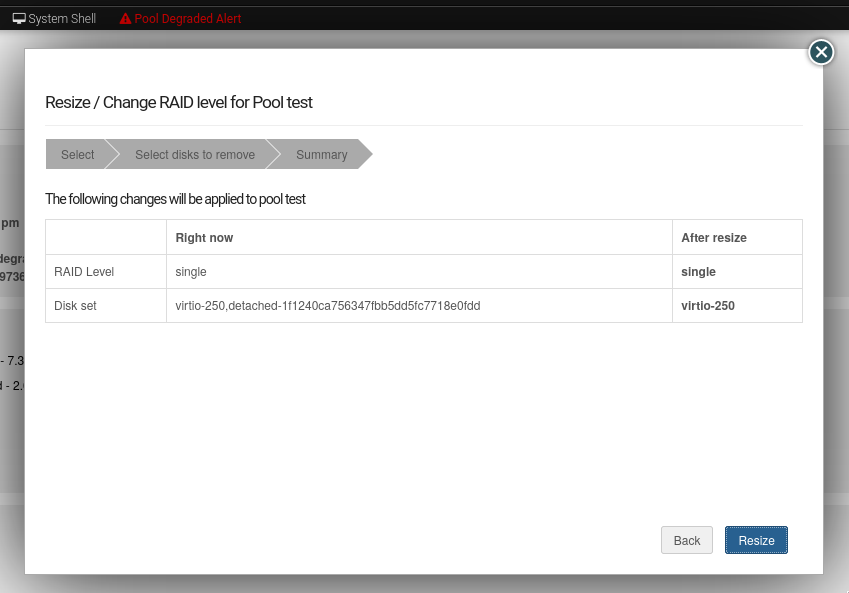
And it’s consequent summary page:
And finally after committing via the Resize button, we have the same Resize ReRaid wizard complete dialog shown at the end of the earlier Redundancy profile changes example.
Our example degraded pool, post disk removal, has now been returned to a non degraded state. And consequently the Web-UI header warning about this ‘emergency’ state is no longer displayed. But note that a page refresh in the Pool Details page is required as unlike the leader it does not yet auto refresh.
Be very sure, after having used a degraded mount option, that it is removed from the custom mount options after a Pool has been returned to a non degraded state. A reboot may be necessary to effectively remove this option from actively applying.
Pool deletion
A Pool can be deleted by click on the corresponding trash icon for it in the Pools screen under the Storage tab of the Web-UI.
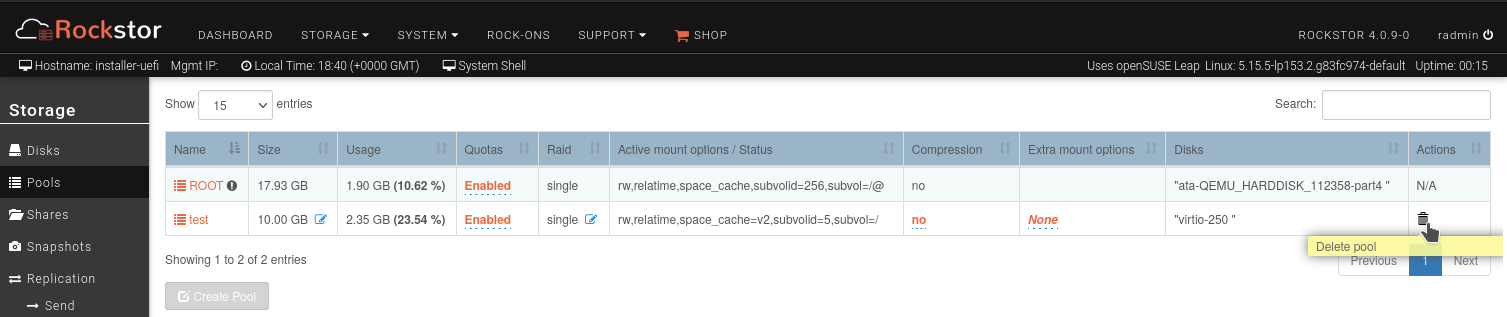
A Pool can also be deleted using the Delete button inside it’s detail screen.
Warning
ALL ASSOCIATED DATA AND SHARES (BTRFS SUBVOLUMES) WILL BE DESTROYED.
Scrubbing a Pool
The scrub operation initiates a BTRFS scrub process in the background. It reads all data from all disks of the Pool, verifies checksums and fixes corruptions if detected and possible. To find out more, see the btrfs-scrub manual entry.
To start a scrub, go to the Pool’s detail page and click on the Start a new scrub button in the Scrubs tab. The button will be disabled during the scrub process and enabled again once the scrub finishes. The progress of a running scrub operation is displayed in a table. Refresh the page to update the information.
Automated Scrubs
A periodic scrub is a proactive strategy to fix errors before too many accumulate. You can Create a Scrub Task on the Scheduled Tasks page under the System menu item.
Balance a pool
The balance operation initiates a BTRFS balance process in the background. It spreads data more evenly across multiple disks of the Pool. It is automatically triggered after a Pool Resize/ReRaid operation, which is the main purpose of this feature. A standalone balance operation is intended for advanced users who can judge for themselves if it is necessary. To find out more, see the btrfs wiki balance section.
To start a balance, go to the Pool’s detail page and click on the Start a new balance button in the Balances tab.
