Data loss - prevention and recovery in Rockstor
There is no single cause of data loss, as failures in power, hardware, software, or setup and maintenance, can trigger whole pool failure, or part corruption of its data/metadata. As such, given no raid arrangement in isolation fulfills the purpose of a backup, always make sure you have a robust and tested backup system for any critical data.
Warning
We strongly recommend that you create periodic backups of all critical Shares (btrfs sub-volumes).
Note
The data loss risks associated with power failure can, in part, be minimised by the use of a correctly integrated Uninterruptible Power Supply (UPS). See our UPS / NUT Setup doc section for details on how to configure a UPS with Rockstor.
Note
Hardware integrity is particularly difficult to establish/assert. Primary concerns are mostly addressed by using only quality/reputable over specification PSU units. Keeping in mind that adding drives significantly affects power requirements. Using ECC memory if possible, and test its function before critical deployments. Using only NAS orientated drives, and again test their function before critical deployments. Ensuring any drive used supports drive TLER/ERC/CCTL capability (GitHub issue) configured for the typical NAS timing of around 7 seconds. See our Pre-Install Best Practice (PBP) for RAM, drive, and installer testing options.
Note
The nature of btrfs gives it the ability to check for data/metadata integrity. This is done on every read and write operation. But only for the data/metadata concerned in those operations. All other data/metadata at-rest can be check by Scrubbing a Pool. Please note the subsection Automated Scrubs. Pool scrubs are extensive operations, as they read all data-metadata on a pool. Consequently they have a wear/performance/power-use downside that can last for many hours. Consider carefully the trade-off between the downsides and testing for at-rest corruption. If in doubt consider a schedule of around 1 scrub per month as a starting point.
Pool drive count advice
Note
It is good practice to exceed the minimum drive count for the btrfs-raid level used. This can help to simplify dealing with failing pool members as they can then be removed via a Pool Resize/ReRaid, without first having to change the pools btrfs-raid level. As this in turn complicates and narrows the repair options available. And greatly increases the number of disk operations required to restore the prior btrfs-raid level. See the Pool has below minimum members subsection of the above doc reference.
Warning
As of writing btrfs has no hot-standby capability. A current work around is to at least maintain an unallocated drive. That way this spare/unused, but system attached drive, can be added to a needy pool via a Pool Resize/ReRaid, or serve as a replacement device in a btrfs replace scenario, such as in Btrfs replace. This advise caters to scenarios where down time is a critical concern.
Backup recommendations
If you have critical data on Rockstor, we strongly recommend that you have a backup. Ideally two of them, in too different locations. Here are some recommendations.
Use Rockstor’s replication feature to asynchronously and automatically replicate important shares on another Rockstor system.
Use reputable backup orientated software configured to replicate important Shares, ideally to both on- and off-site sources (note that we have a number of backup-orientated Rock-ons (Docker Plugins) available).
Create periodic backups of your Rockstor configuration (See Configuration Backup and Restore).
The nature of btrfs
BTRFS is the underlying filesystem of Rockstor. Unlike almost all other filesystems btrfs is also a device manager of sorts. This allows, via btrfs-raid levels, for a btrfs volume (Pool in Rockstor speak), to be a Redundant (storage) Array of Independent Devices (RAID). Depending on the btrfs-raid level used btrfs can either sense or sense-and-auto-correct corruption. For redundancy/repair capabilities see our Redundancy profiles.
The core mechanisms used to counter corruption are:
Checksumming: a metadata component to verify data/metadata integrity: all btrfs-raid levels.
Copy-on-Write or ‘CoW’: no existing data/metadata is overwritten by its own update: all btrfs-raid levels.
Duplication of data/metadata: depends on btrfs-raid level.
Note
Btrfs-raid levels are like, but not identical too, traditional hardware or software RAID. Btrfs manages redundancy on a Chunk, not just a device level. For a detailed description of the btrfs design take a look at Btrfs design
Warning
Please see the btrfs status page for known btrfs-raid level related issues. Specifically the less mature parity btrfs-raid levels of 5 and 6. Btrfs-raid levels of 5/6 are not currently considered production ready; we honour our upstream’s default of read-only for these btrfs-raid levels. Rockstor v4 is “Built on openSUSE”. See our Installing the Stable Kernel Backport if you need read-write access on btrfs-raid5/6 pools.
Web-UI and Data Integrity threat monitoring
The modern Rockstor Web-UI is able to indicate btrfs ‘device missing’, and btrfs sensed errors; such as Write, Read, Flush, Corruption, and Generation; all on a per Pool and per Disk basis. We also have, within the Web-UI, the ability to do on-the-spot S.M.A.R.T reports, and tests. Automated disk S.M.A.R.T monitoring is also possible via:
and our Web-UI configurable default upstream SmartMonTools install (smartd).
Note
Automated S.M.A.R.T health reporting (via smartd) requires configuration (Web-UI based). The S.M.A.R.T service just needs a start configuration, and then to be enabled. Our upstream smartd default configuration is empty.
Pool degraded indicators
When a drive goes missing/detached the Web-UI has three main indicators.
Web-UI header has red, slow flashing Pool Degraded Alert text, with mouse over details. These details include the pool label if the pool has previously been imported. Otherwise the number of unimported degraded pools is indicated.
The associated Pool’s details page Disks section indicates the detached/missing disk/s. Note that the Pool overview table also shares the “Some missing” and detached indicators.
A new Maintenance require section appears within the same Disks Pool details area. Giving guidance on how to proceed to help ensure data integrity.

Web-UI components detailed in the above list.
Pool ‘Maintenance required’
This section appears on pools that are reporting missing devices. The guidance text displayed alerts according to the pool state and mount options used. Its directive is to first establish ro access to the pool, to enable refreshing backups, then to assist with re-establishing the pools prior healthy state.
Note
Only Redundancy profiles/btrfs-raid levels that can tolerate drive failure can be successfully remounted degraded. Or imported, even using the : Import unwell Pool instructions
Btrfs device statistics
The Web-UI will also display the cumulative ‘btrfs device stats’ output for all Rockstor managed Pool members.
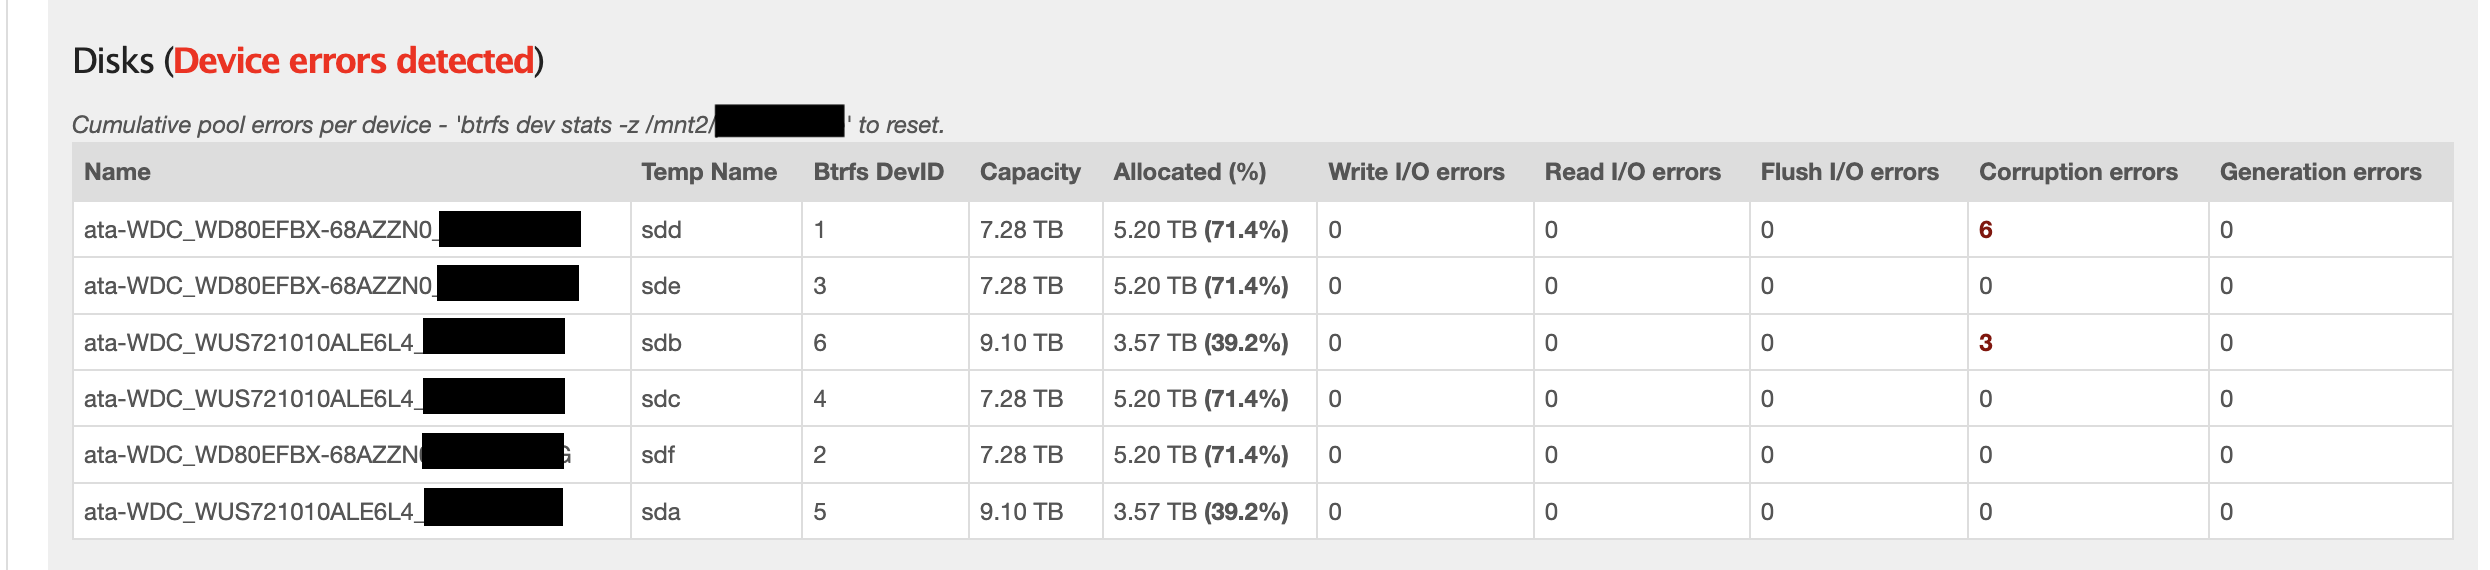
Cumulative Pool device errors per member.
Asking for help
If you are in a data loss scenario, we would like to help. See our Support options.
If you are already knowledgeable in btrfs and system administration, see the upstream community Libera Chat - #btrfs channel. Finally, if your needs are extreme, consider seeking help on the btrfs mailing list (linux-btrfs). More details on subscribing to the mailing list are available here.
Warning
The btrfs mailing lists is primarily for btrfs developer use. Time taken-up on trivial interactions there may not be fair to the world of btrfs development.
Also take note of what you are usually expected to include:
uname -a
btrfs --version
btrfs fi show
btrfs fi df /home # Replace /home with the mount point of your btrfs-filesystem
dmesg > dmesg.log
Note
The dmesg information output may be very large. If it is, instead of pasting it into the mail body,
it should be attached to the mail. However, check the restrictions on overall mail size on the
etiquette page.
Data Recovery: btrfs-raid0 and btrfs-single Pools
See our Redundancy profiles for the nature of btrfs-raid0 and btrfs-single.
If a drive is only suspected of poor health, but still functional, see: Btrfs replace. But if a drive in btrfs-raid0 or btrfs-single fails, the pool becomes completely unusable. The recovery strategy is then:
Wipe the now orphaned remaining prior pool members via Wiping a Partition or Whole Disk.
Hardware replace the failed disk.
Remove the Web-UI Detached Disks entry.
Creating a Pool a-fresh.
Recreate all prior Shares.
Restore share/s data from a backup.
Recreate all prior File sharing.
Re-installing any Rock-ons (Docker Plugins) directly associated with this Pool.
All Pool/Share/Export operations can be done from within the Web-UI, which is the recommended approach. Note that recreating File sharing and Rock-ons may be done by using Configuration Backup and Restore.
Note
As btrfs-raid0 and btrfs-single have no redundancy, there is no capability for drive loss. Hence having to re-do all prior configuration associated directly with the affected Pool.
Data Recovery: btrfs-raid1 and btrfs-raid10 Pools
See our Redundancy profiles for the nature of btrfs-raid1 and btrfs-raid10.
If one drive fails in a btrfs-raid1 or btrfs-raid10 pool, the pool will continue to function. But there is, from this point on, a high risk of losing all data, as there is now only one copy of some or all chunks in the pool. Although it may rapidly default to read-only as a precautionary measure.
The recovery strategy can be guided by the Pool ‘Maintenance required’ section.
Note
If Pool has below minimum members then consider Adding Disks, after establishing a degraded mount, as per the later stages of the Pool ‘Maintenance required’ suggestions.
If the pools has at least 2 (btrfs-raid1) or 4 (btrfs-raid10) attached members remaining, its health may well be returned by a simple:
Pool Resize/ReRaid -> Removing Disks action selecting the detached disk in the process.
The detached disk will then no longer be Pool Associated and so can then be removed via the Non Pool Associated instructions.
If desired, to return the prior, and recommended, greater-than-minimum disk count, simply use the Pool Resize/ReRaid -> Adding Disks option.
If more than one drive in a raid1 or raid10 pool simultaneously fail, the scenario becomes catastrophic. In which case follow the recovery strategy described in Data Recovery: btrfs-raid0 and btrfs-single Pools.
Data Recovery: btrfs-raid5/6 Pools
See our Redundancy profiles for the nature of btrfs-raid5 and btrfs-raid6. Take particular note of the above Pool drive count advice with the less mature parity based btrfs-raid levels.
Warning
Important!
These steps only apply to btrfs-raid5 pools with 3+ drives or btrfs-raid6 pools with 4+ drives.
There are known but unresolved bugs that may make balances, for a small number of users, take an order of magnitude longer than expected.
Note
The ‘btrfs replace’ command covered in Btrfs replace may take an extraordinarily long time to complete in the case of a missing drive. It may also fail in a way that destroys data on repeated usage! As such the ‘btrfs replace’ method is not recommended for the parity btrfs-raid levels.
This recovery strategy can be guided by the Pool ‘Maintenance required’ Web-UI section. Once you have the suggested degraded,rw mount option in place (post backup refresh via ro):
Use the Pool Resize/ReRaid -> Adding Disks option.
then do Pool Resize/ReRaid -> Removing Disks option, selecting the detached disk.
Finally remove the detached disk via the Non Pool Associated instructions.
If more than one drive (btrfs-raid5) or two drives (btrfs-raid6) fail simultaneously, the scenario becomes catastrophic. In which case, follow the recovery strategy described in Data Recovery: btrfs-raid0 and btrfs-single Pools.
Btrfs replace
Btrfs has the ability to do an in-place and on-line direct drive replacement. The btrfs replace command effectively switching out, bit-by-bit, one drive for another. Currently this operation does not yet have a Rockstor Web-UI ‘wrapper’ but one is planned (GitHub issue #1611). The intended location for this interface is along-side our existing Pool Resize/ReRaid options. It is always worth checking your existing install in case it is ahead of this document.
A work-around for no Web-UI replace option is to use Adding Disks, followed by a Removing Disks on the associated pool. Or visa-versa, depending on space limitations, drive connections available, drive count in the context of the btrfs-raid level etc.
The drive to be replaced can also be missing, see Replacing a missing drive.
Note
An important function of ´btrfs replace´ is its ability, via an optional switch “-r”, to only read from the to-be-replaced drive if no other zero-defect mirror exists. This is particularly noteworthy in a data recovery scenario. Failing drives often have read errors or are very slow to achieve error free reads. See our dedicated Replacing a failing but still working drive section which uses this options.
Warning
In some cases a Btrfs replace operation can leave a pool between redundancy levels. This presents a risk to data integrity. Please see our Re-establish redundancy section for details.
Resizing when replacing
It is always simpler to replace a drive with one having a larger capacity. But if this is not possible, it is required that you first resize the to-be-replaced drive. It must be resized to be smaller, if it isn’t already, or exactly the same size, as the drive that is to replace it.
btrfs filesystem resize DevID:899GiB /mnt2/pool-name
DevID is the DeviceID within the pool of the drive to be resized.
Resize larger replacements
The btrfs replace command, by its nature of a direct byte-for-byte operation, ends up with the replacement drive having the exact same filesystem ‘size’ as the drive it replaced. It is therefore, currently at least, necessary to then maximally resize the replacement.
Once all related btrfs replace operations have been completed, see Replacement status the new drive can be expanded to use it full hardware capacity via:
btrfs filesystem resize DevID:max /mnt2/pool-name
DevID is the DeviceID within the pool of the new, larger replacement.
Replacing a failing but still working drive
In some situations a dive will not fail outright but show signs that it is about to do so. Indications of pending failure may be via Btrfs device statistics associated with that device. Or it may be via S.M.A.R.T statistics indicators or test failures. In circumstances such as these, the work-around of adding and then removing a device,
In the case of a failing disk the ‘replace’ work-around of disk add/remove or remove/add, referenced in our sub-section header Btrfs replace, is far from optimal. The extreme reads/writes associated with these steps could fully fail an otherwise borderline functional device. Potentially failing the entire pool. After adding a disk Rockstor automatically does a full balance, to enhance ease of use; at the cost of performance. And btrfs itself does an internal balances to effect a drive removal.
For whatever reason, it can sometimes be preferred to do an in-place direct drive replacement. Depending on the btrfs-raid level used, this may also be your only option.
So when a direct disk replacement is required, the command line is also required.
btrfs replace -r start DevID /dev/disk/by-id/replacement-disk-by-id-name /mnt2/pool-name
DevID is the DeviceID within the pool of the drive to be replace.
Note
Note the use of the “-r” option. This is precautionary: only read from the to-be-replaced drive if no other zero-defect mirror exists. An optimal arrangement for a failing disk. If you are just after the fastest command line disk replacement, and all disks are known good, this option can be removed for improved performance.
Replacement status
To monitor the command line disk replacement progress, use the following command:
btrfs replace status /mnt2/pool-name
During a command line replacement the Rockstor Web-UI should still be functional. With the Pool details page indicating, over time, the transition of data away from the to-be-removed disk. If possible avoid enacting any further Pool operations until the disk replacement has completed.
Replacing a missing drive
Replacing a missing drive is identical to replacing an attached on. But note that ‘brrfs replace’ requires a mounted Pool, which may require the degraded mount option. See the Pool ‘Maintenance required’ section for guidance.
The DevID for missing devices can be found via the following command:
btrfs device usage /mnt2/pool-name
Look for the “missing, ID:” device entry.
Re-establish redundancy
Warning
After some btrfs Pool (btrfs volume) operations, especially those concerning in-place drive replacement, some Pool chunks (btrfs-raid units) may have insufficient redundancy. A scrub has been known to NOT fix this circumstance.
Note
Rockstor’s Web-UI does not currently ‘catch’ this unwanted corner case. But this is a planned feature to add to our Web-UI and Data Integrity threat monitoring list.
Using the ‘btrfs usage’ command, one can discover if a pool has unwanted mixed btrfs-raid chunks.
btrfs fi usage -T /mnt2/pool-name
Look for unexpected btrfs-raid level entries in the resulting table (Data/Metadata/System). In the case of anomalous ‘btrfs replace’ chunks they may well show as “single”.
If found the Rockstor Web-UI Balance a pool option should resolve this situation. Alternatively use a Command line Balance ReRaid.
Command line Balance ReRaid
In some situations, such as where an undesirable, or unsupported raid profile is in play. Or an inadvertent loss of redundancy has been left by for example a pool corruption or a device replace event. A command line btrfs balance may be needed.
The following is an example of returning a pool to a desired raid profile.
btrfs balance start -dconvert=data-raid-profile,soft -mconvert=metadata-raid-profile,soft /mnt2/pool-name
Note
The recognised btrfs-raid profiles are: raid0, raid1, raid1c3, raid1c4, raid10, raid5, raid6, dup, single. However raid1c3 and raid1c4 are only available after Installing the Stable Kernel Backport.
A balance can take many hours to complete. The following command can be used to monitor the progress of any ongoing balance:
btrfs balance status /mnt2/pool-name
Rock-on Restore
When Rock-ons are not visible after data restore or pool import, it is possible that they are either running silently in the background or Rockstor does not have the needed information to restore the Rock-ons. Here is how to get your Rock-ons back up and running.
