Rock-ons (Docker Plugins)
Rock-ons are Rockstor’s name for its use of docker containers to provide a Plugin System to easily expand the functions of a base Rockstor install.
Each Rock-on aims to provide a single additional service and the list of Rock-ons available by default is expanding all the time.
Note
We are striving to provide Rock-ons as multi-architecture apps,
namely for amd64 (Intel/AMD CPUs) and arm64 (ARM-based) devices.
This is not always possible, however the supported architectures are
usually noted in the Rock-on description in the WebUI.
Initial Rock-ons Setup
As Rock-ons/docker containers are like mini linux installs, they require somewhere to live. In Rockstor it is recommended that you setup a Share specifically for this purpose.
Warning
It is recommended to not use the system disk to store Rock-ons and their configurations on. Storing Rock-ons on the system disk will make Rock-on restores more difficult. See Rock-on Restore for more information.
Note
All Rock-ons will then be installed into this shared area but each will remain independent and during the setup of each Rock-on you are given the option to store their respective configuration and data in other shares. This is good practice as it keeps your Rock-on config and data apart from the Rock-ons themselves. You do not have to separate the config and data within each rock-on but that is also good practice, and is why this option is offered.
It is assumed you have already setup your Pools and one or more shares in those pools (see our Creating a share) appropriate for your Rock-ons, i.e. a plex-movies share and a plex-config share.
But we also need to create the The Rock-ons root share.
The Rock-ons root
All Rock-ons require the Rock-on service to be enabled and prior to enabling this service it must be configured. This is a simple matter of configuring a sufficiently large share for the rock-ons to be installed into.
We recommend creating a dedicated share to be used as the rock-ons root. While any share can be chosen as the rock-ons root, we strongly recommend to create a share to be used only as the rock-ons root to prevent any conflict that may arise with a mixed-used share. The rock-ons root share is used by Docker to store permanent data such as images and container layers. As a result, any conflict or alteration of these data that might result from a mixed used share has the potential to break the installed Rock-ons. Note also that the rock-ons root share can be part of any pool and does not require the creation of a dedicated pool.
Note
While it is possible to use the existing ‘out of the box’ home share this is not recommended for the reason described above. Similarly, while it is possible to create the rock-ons root share on the system pool, this is not recommended either.
As an example, the following shows a Recommended Minimum 5 GB rock-ons-root share backed by a previously created pool named rock-pool.
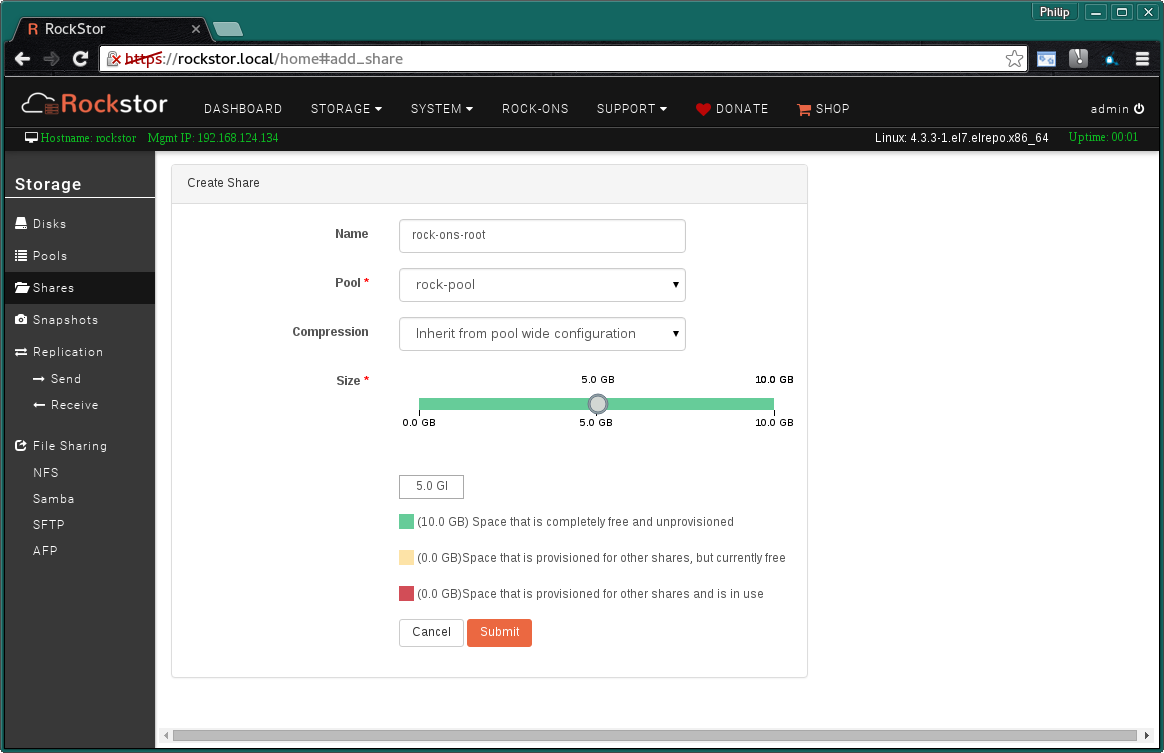
Note that during the lifetime of Rock-ons several snapshots will be created so plan to be able to expand this share if need be.
Then click on the spanner next to the Rock-on service on the System page.

Now to select the share to use for your Rock-ons root.
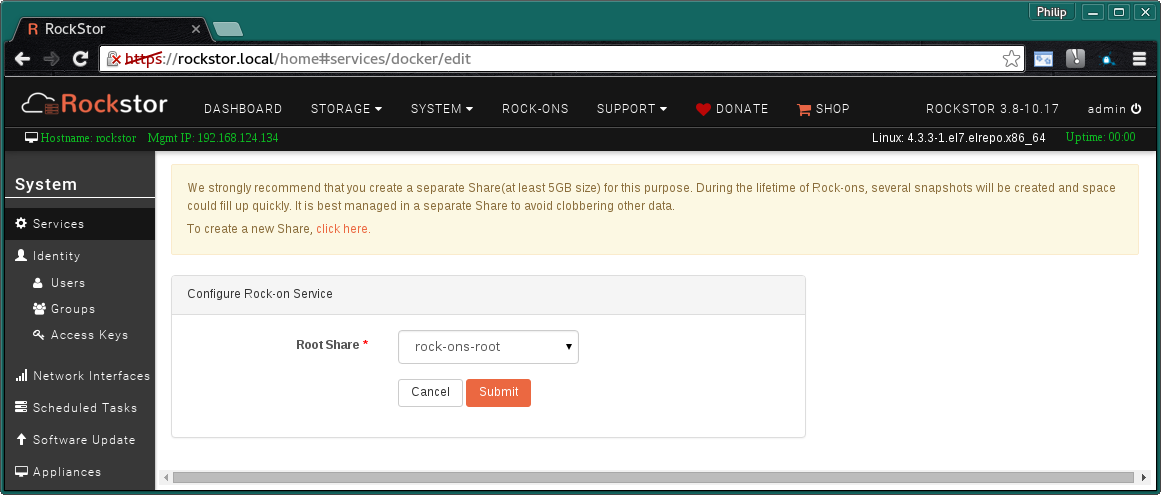
Select the rock-on-root share that we created earlier and Submit
You can now enable the Rock-on service and proceed to the Rock-ons page.
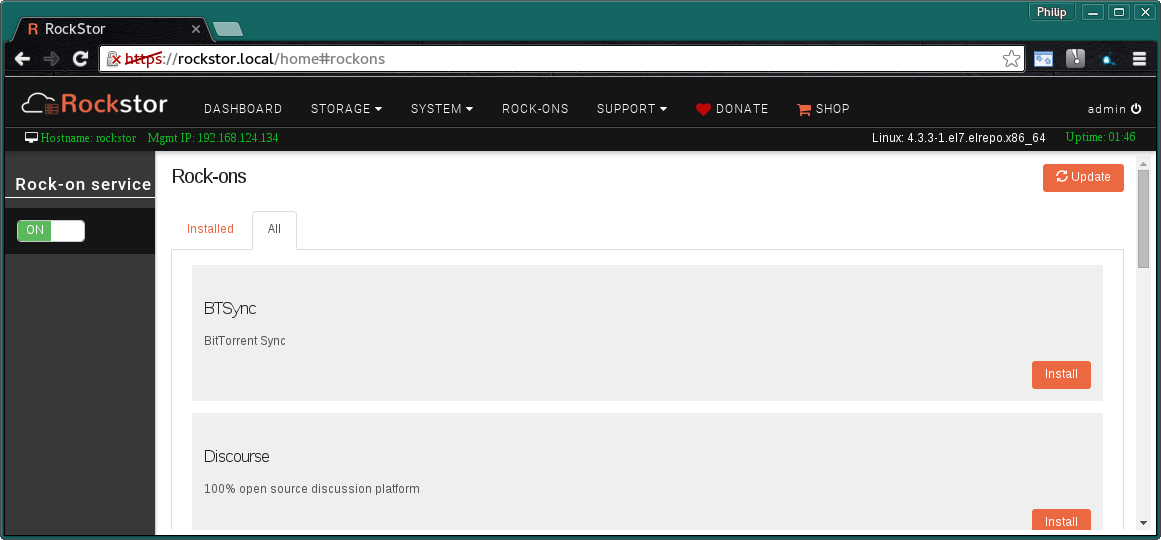
If no Rock-ons are showing on the All tab then click the Update button to refresh the list of available Rock-ons. To install a listed Rock-on use its Install button on the Rock-ons WebUI page.
UID and GID usage in Rock-ons
During the configuration of Rock-ons, quite a few require the specification of a User ID (UID) and/or a Group ID (GID). Aside from the various options using the command line to determine existing UIDs and GIDs, the simplest way is to take advantage of the User and/or Group management screens. Navigate to System –> Users (or Groups if necessary).
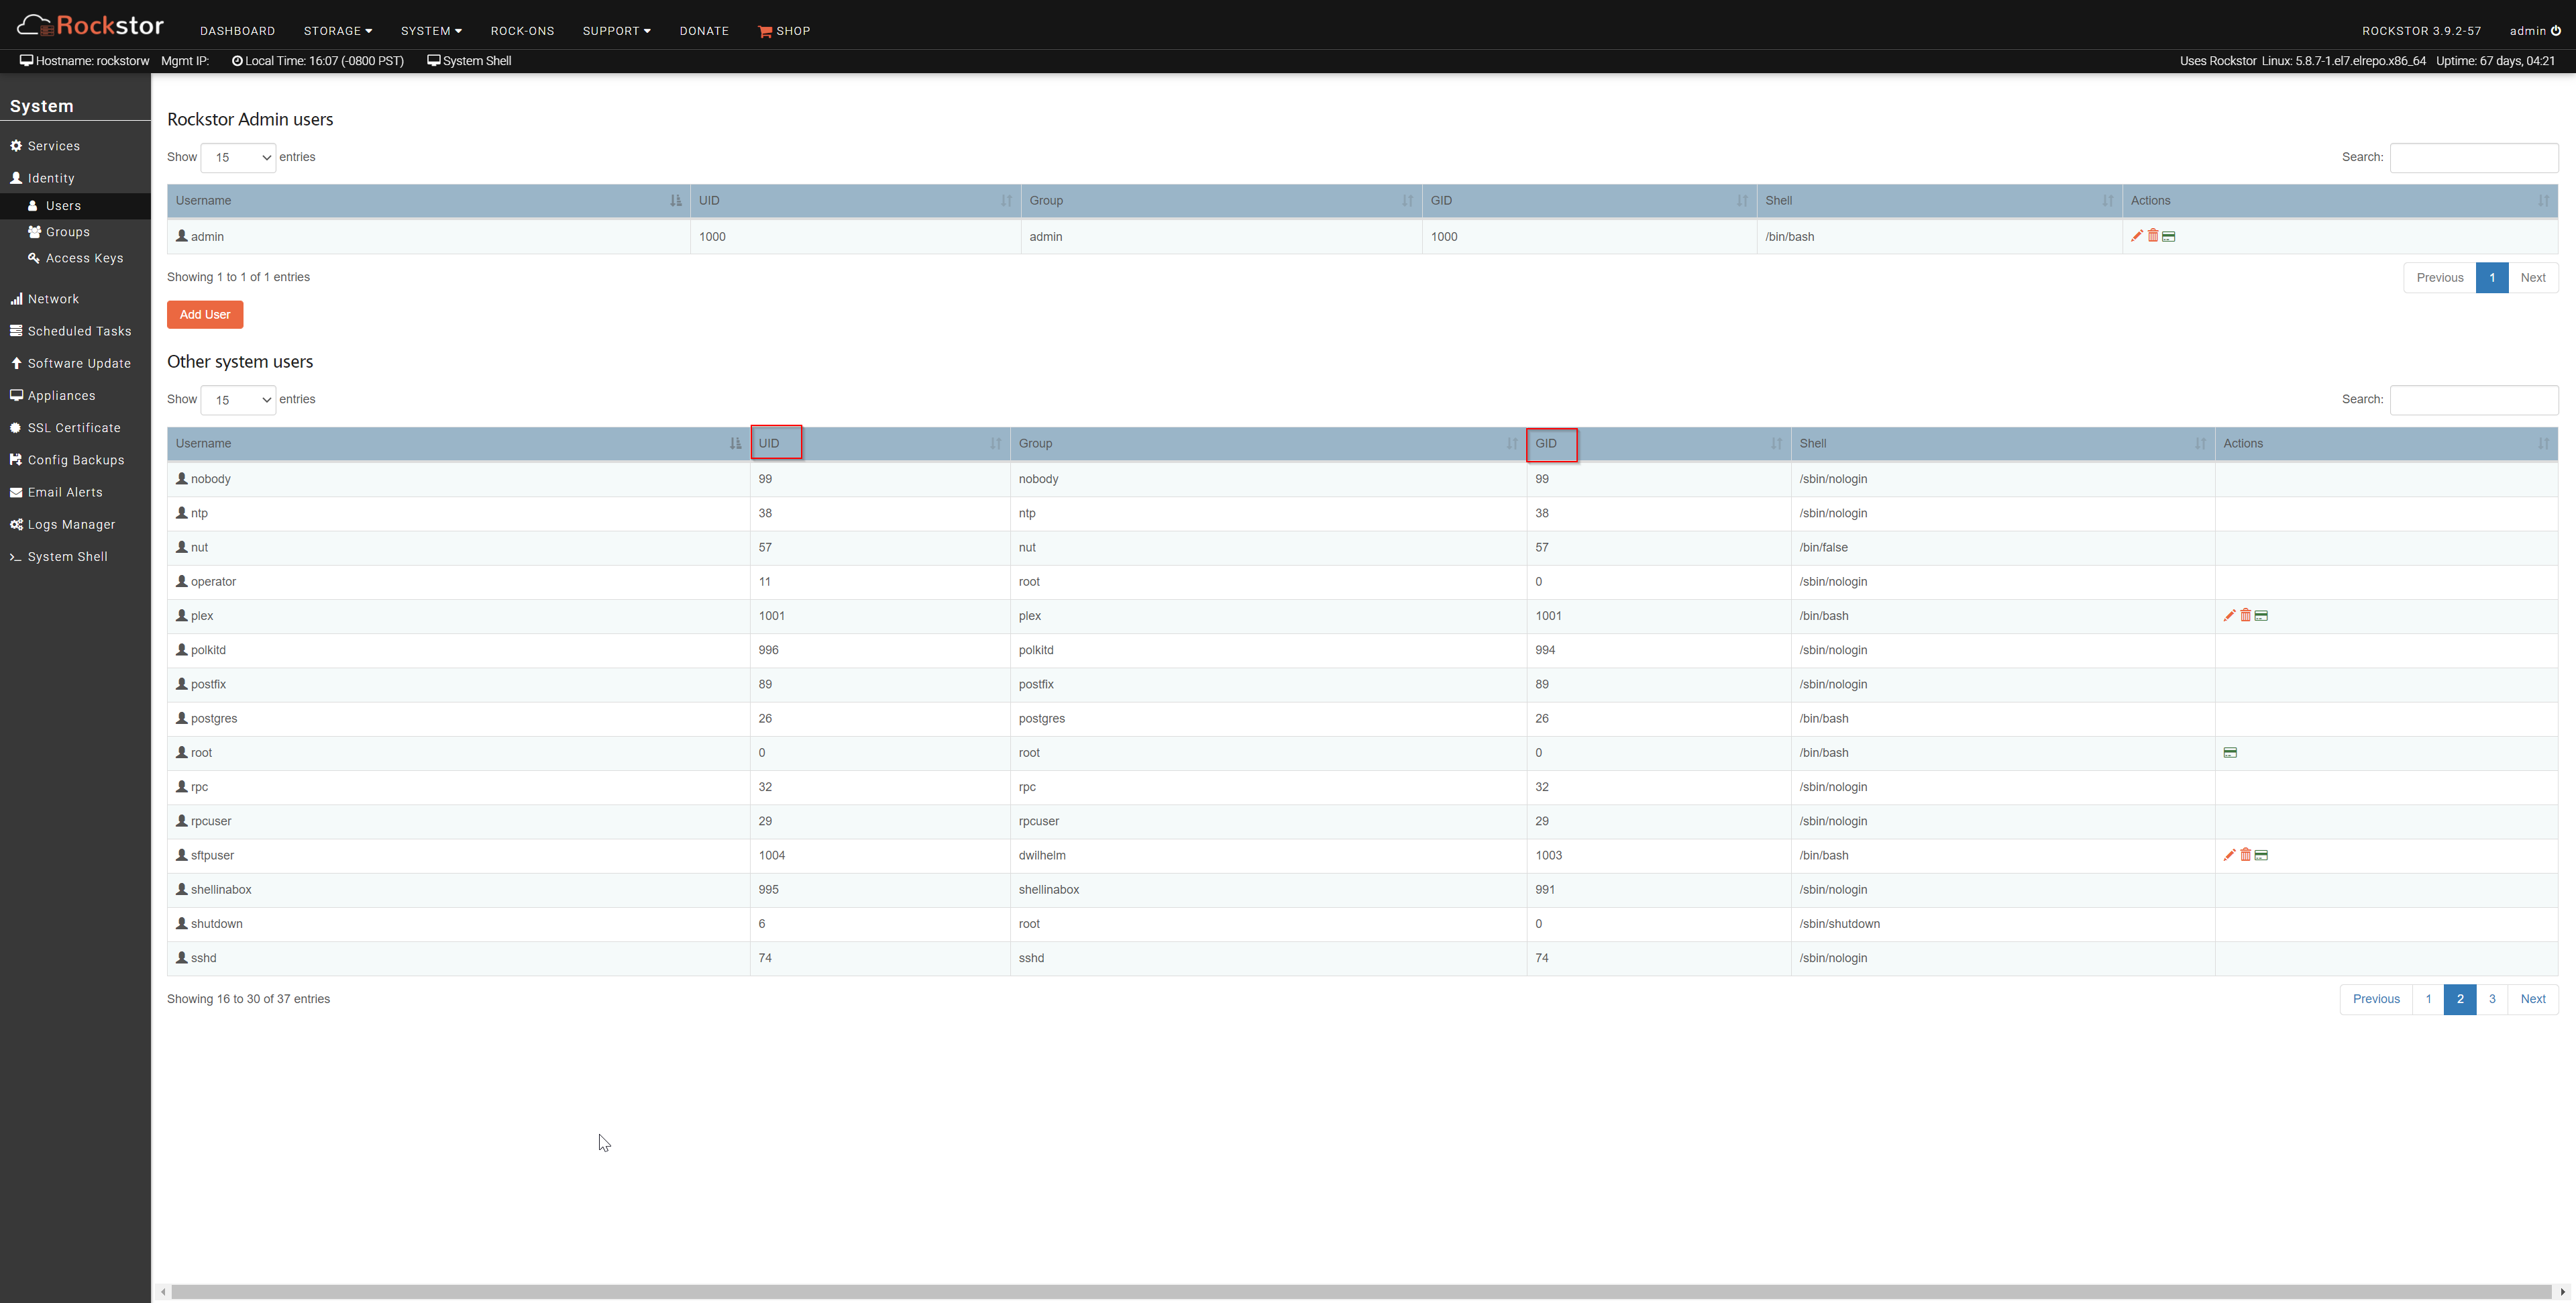
The two highlighted columns show the UID and GID. In the example above, the
user plex has the UID 1001, as well as the GID 1001, which could then
be used to set up the Plex rock-on.
Adding your own Rock-on
The rockon-registry contains the current list of freely available rock-on definition files and servers as the repository for Rock-ons available by default. Please consider contributing, or asking your favourite project to contribute, a rock-on via a GitHub pull request to this repository (see Contributing a Rock-on for more information).
Note
It is also possible to add to the available Rock-ons by placing a suitably
configured and named json file in the /opt/rockstor/rockons-metastore
directory of your Rockstor install. For full instructions and examples
please see the How can I add my own Rock-on? section. Some projects prefer to host
their own Rock-on plugins and this feature enables the use of other projects’
official Rock-ons. An example of a project that takes advantage of this
feature is Emby with their official Rock-on
definition file for the Emby server component. However this same Emby
Rock-on has now been added to the official Rockstor Rock-on registry.
Rock-ons available by default
As this list is continually growing, the best place to view the currently included by default Rock-ons is at the rockon-registry or on the Rock-ons page All tab within the Rockstor WebUI directly after pressing the Update button.
Rock-ons without write-ups
Although the following Rock-ons are currently without specific install instructions they are like all Rock-on installs, fairly self explanatory.
Booksonic: Audiobooks streaming server
Cardigann: A proxy server for adding new indexers to Sonarr and other media managers
Collabora online: LibreOffice-based online office suite
COPS: links to your Calibre library database and provides automation features
CouchPotato: Downloader for usenet and bittorrent users
Crashplan: Automatic cloud-based backups
Deluge: Deluge is a movie downloader for bittorrent users
Dropbox: Cloud-based file syncing solution
Duck DNS: Free dynamic DNS service
Duplicati 2.0: Free backup software to store encrypted backups online
ecoDMS: Electronic Document Managing System
Emby server: Emby media server
Ghost: A publishing platform for professional bloggers
GitLab CE: Git repository hosting and collaboration
Gogs: Go Git Service, a lightweight Git version control server and front end
Gollum: Gollum is a simple wiki system built on top of Git
Haproxy: Reliable, High Performance TCP/HTTP Load Balancer with letsencrypt integration
Headphones: Automated music downloader for NZB and Torrent
Home Assistant: Open-source home automation platform
HTTP to HTTPS redirect: Access the Rockstor web UI without having to remember to type “https:”
Jackett: Proxy server for queries from apps such as Sonarr, CouchPotato, and Mylar
JDownloader 2: Free, open-source download management tool
Koel: Simple web-based personal audio streaming service
Lazy Librarian: Automated ebook downloader for NZB and Torrent
Logitech Squeezebox: Server for Squeezebox Devices
MariaDB: MariaDB, relational database management system
Medusa: Automatic video library manager for TV shows
Minecraft: Minecraft server
Muximux: Lightweight portal to view & manage your HTPC apps
Mylar: Automated Comic Book (cbr/cbz) downloader
Nextcloud: Next generation open source enterprise file sync and share
NZBGet: The most efficient usenet downloader
NZBHydra: Meta search for NZB indexers
Ombi: Host your own Plex Request and user management system
OwnCloud-Official: Secure file sharing and hosting
Pi-hole: A black hole for Internet advertisements
PocketMine: Server software for Minecraft: Pocket Edition
Radarr: Radarr is a PVR for Movies on Usenet and Torrents
Resilio Synch: Fast, private file sharing for teams and individuals
Rocket.Chat: Open Source Chat Platform
SaBnzbd: The best usenet downloader
Seafile: Secure file sharing and hosting
SmokePing: Network latency history monitor
Sonarr: (formerly NZBdrone) A PVR for usenet and bittorrent users
Subsonic: Music server
Tautulli: Plex usage tracker
Teamspeak: VoIP software
TFTP server: TFTP server
Transmission with OpenVPN: Transmission torrent client with webUI while connecting to OpenVPN
Ubuiquiti Unifi by Linuxserver.io: Unifi Access Point controller, provided by Linuxserver.io
Unifi Controller: Unifi Access Point controller
uTorrent: BitTorrent client
Vaultwarden: Unofficial server written in Rust for the password manager Bitwarden
Watchtower: A process for automating Docker container base image updates
Xeoma: Video surveillance
Zabbix-XXL: Network and application monitoring
ZeroNet: Decentralized websites using Bitcoin crypto and the BitTorrent network
Rock-ons with write-ups
Please see the following sections for some specific Rock-on install details. Note that not all Rock-ons have their own specific instructions in these docs.
Advanced Configuration
While the installation and initial setup of Rock-ons is kept as simple and user-friendly as possible, it is possible to further customize their configuration post-install. At the time of writing, users can customize their existing rock-on installation with additional storage, customized docker container labels, alter ports, or connect and disconnect user-defined rocknets. Note that this area is under active development to provide further customization options.
Add Storage
The Add Storage feature allows the binding of any Rockstor share to an installed Rock-on. As any share can be added as storage to multiple Rock-ons, this represents a convenient and easy way to make a set of files accessible to multiple Rock-ons.
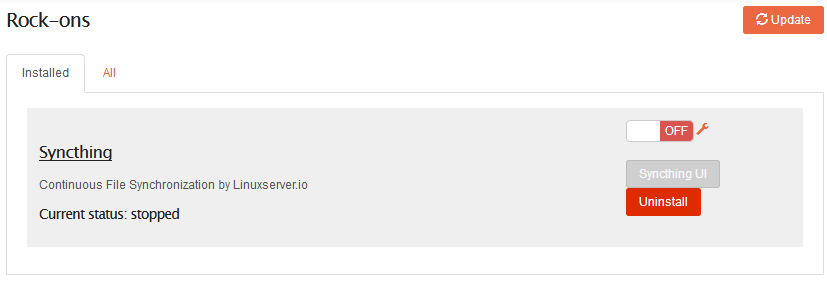
To start, make sure the Rock-on is turned OFF, and click on the little wrench icon next to the ON / OFF toggle to display a summary of the Rock-on’s settings.
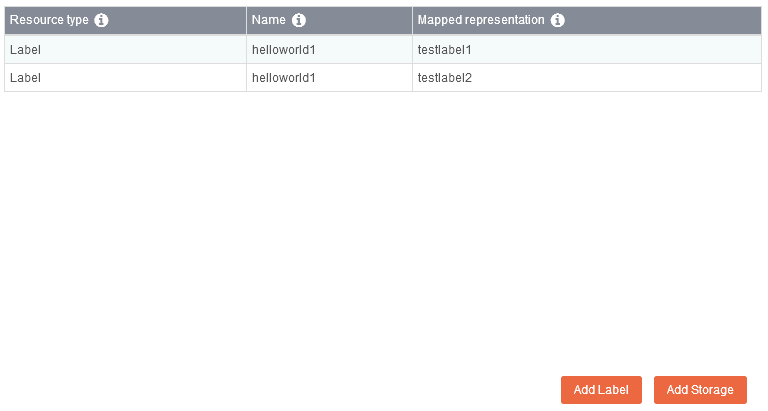
This summary table displays, all volumes, ports, environment variables, labels,
and devices used by the Rock-on (if any). After a fresh Rock-on install, all
objects set during the install are reported here. In our example, the
Syncthing Rock-on has the Rockstor shares syncthing_conf and
syncthing_sync mapped to the /config and /home/syncthing/Sync paths
inside the Rock-on, respectively, exposes three different ports to the host,
and uses two environment variables (PUID and GUID).
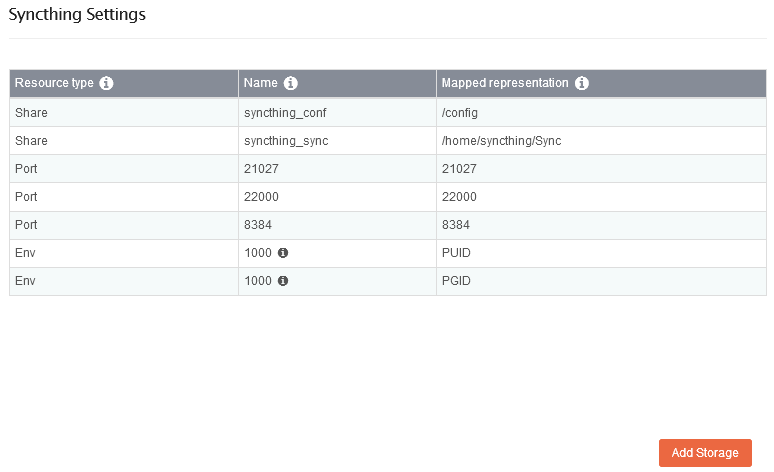
To Add Storage to this Rock-on, click the Add Storage button on the bottom right corner. Note that this button will only be displayed if the Rock-on supports this feature. In the following dialog window, select a previously-created share (see our Creating a share section), and define the path under which it will be seen from within the Rock-on.
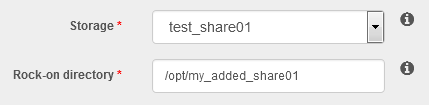
In this example, the Rockstor share test_share01 will be added as
/opt/my_added_share01 from within the Rock-on.
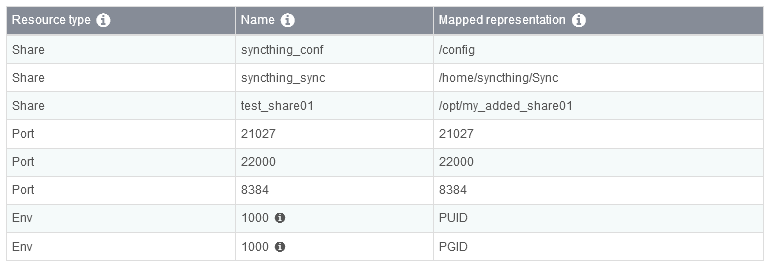
The next window summarizes the already-existing and new settings to be applied (here: new share). If everything is correct, click “Next” and then “Submit” to update the Rock-on settings with the newly-added storage. Internally, Rockstor will first uninstall the Rock-on before re-installing it with the updated settings summarized in the previous table.
Add Labels
The Add Labels feature allows to apply customized docker container labels (docker documentation) to any installed Rock-on. To add a new label within an existing Rock-on, make sure the Rock-on is turned OFF, and click on the little wrench icon next to the ON/OFF toggle to display a summary of the Rock-on’s addlabels_settings_summary (see Add Storage for description of this table).
To add a label to a given Rock-on, click the Add Label button at the bottom of the Rock-on settings summary page.
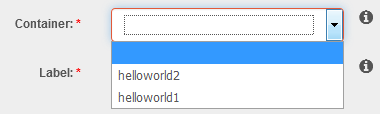
Notably, as labels are applied at the container level, the next dialog will allow you to select the container to which the label will be applied. Conveniently, Rockstor will only list the containers included in the current Rock-on. In the example below, the Rock-on includes two containers: helloworld1 and helloworld2.
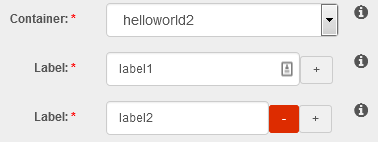
To apply two different labels to the container helloworld2, simply add as many label fields as needed, and type your labels.
Click “Next” and verify your new label-to-container mapping(s) before finishing the procedure by clicking “Next” and “Submit”. Internally, Rockstor will first un-install the Rock-on before re-installing it with the newly-defined labels.
Networking
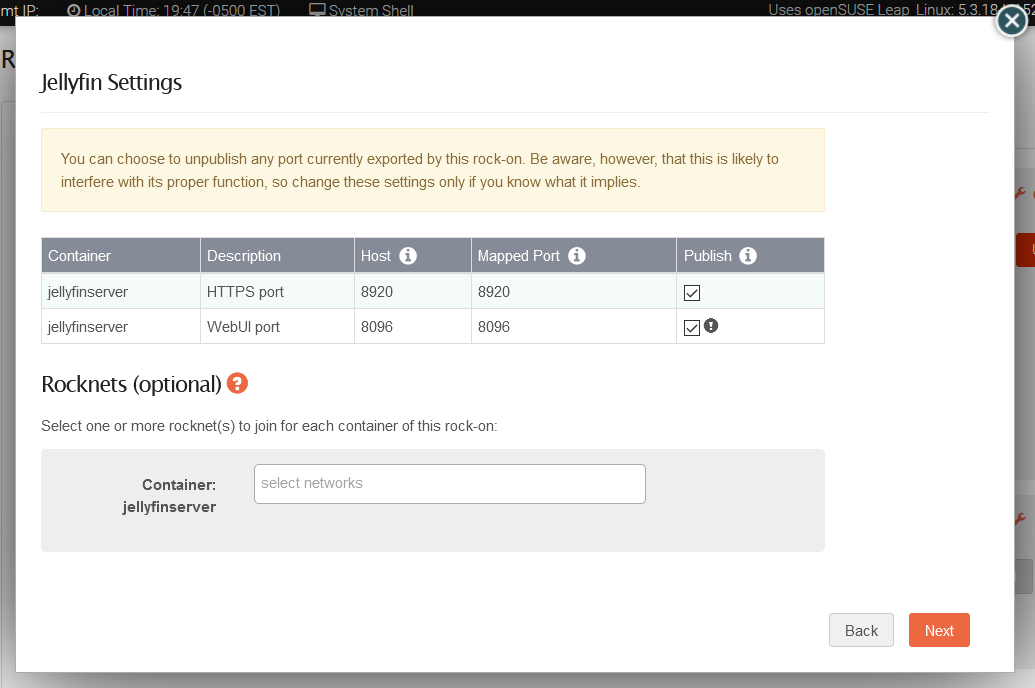
Some elements of docker networking can be easily configured from Rockstor’s webUI for each rock-on. Any container of a given rock-on can thus be connected to a rocknet (a user-defined docker network), and any published port can be unpublished (and vice-versa). To customize these elements, make sure the rock-on is turned OFF, and click on the little wrench icon next to the ON/OFF toggle to display a summary of the rock-on’s settings (see Add Storage for description of this table). Clicking on the Networking button will present the following window:
Note
Please see Docker network (Rocknet) for how to create a rocknet.
Edit ports
The Edit Ports feature allows to alter the publication state of any port mapped to the rock-on. By default, all ports defined during the rock-on installation are published and thus available for communication. In some cases, however, one may choose to unpublish a specific port, or re-publish a previously unpublished port.
The top section of the Networking customization window lists all exposed ports defined in the rock-on (if any) as well as their corresponding container, description, port number on host, and port number mapped on the corresponding container. Finally, a checkbox allows each port to be published (if checked) or unpublished (if unchecked).
Warning
Important! Unpublishing a port defined for the Rock-on’s web-UI will make it inaccessible from Rockstor’s Rock-ons page. For convenience, such ports are accompanied by a warning icon next to the checkbox.
Click Next and verify the new publication state for each port before finishing the procedure by clicking Next and Submit. Internally, Rockstor will first uninstall the rock-on before re-installing it with the new settings (publishing only those ports set to be published).
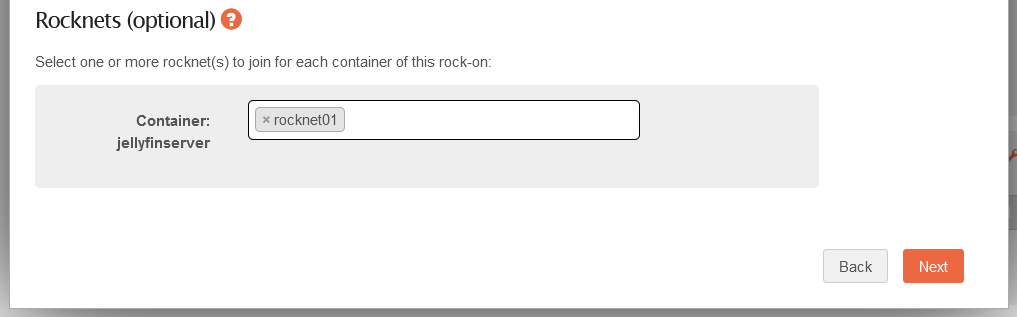
Joining Rocknets
The Rocknets section allows to connect and/or disconnect any container of a given rock-on to a rocknet (see Docker network (Rocknet)). As each rocknet is associated to a container rather than to a rock-on, Rockstor offers the ability to connect/disconnect each container of a given rock-on to one or more rocknets separately. As a result, one can for instance connect some containers of one or more rock-ons to a backend rocknet, and others to a frontend rocknet. In the example above, both containers of the rock-on are not currently connected to any rocknet, so the lists are empty.
To join a currently existing rocknet, simply click on the search field and select it from the drop-down list, or type its name. Note that it is possible to directly create a new rocknet from this field by typing a new rocknet name and pressing Enter. Upon submission and completion of the rock-on update procedure, a new rocknet with the corresponding name will be created and connected to the given container.
To disconnect a container from a rocknet, simply delete the rocknet’s name or click the “x” next to it.
Warning
Important! Rocknets newly-defined directly from this page will be created using Docker’s default parameters. If different settings are desired, please create the rocknet first from the System > Network menu, and then connect the container to it. Alternatively, it is also possible to edit an existing rocknet’s settings from the System > Network menu.
Once all rocknets are connected and/or disconnected to containers as desired, click Next and verify the new settings are correct before finishing the procedure by clicking Next and Submit. Internally, if rocknets are the only modifications made to the rock-on, Rockstor will apply the new settings on the fly without first uninstalling the rock-on. If a port’s publication state was also modified, however, Rockstor will proceed with the full update procedure (uninstalling and re-installing the rock-on with the new settings).
Uninstall of a Rock-on
Uninstalling a Rock-on is straightforward:
Toggle the Rock-on OFF. The Uninstall button will appear.
Click the Uninstall button, and confirm the process in the dialog window.
This will remove the underlying Docker container(s) and related entries in Rockstor’s database. Note that this will not delete or alter data in the Share(s) that were used for the uninstalled Rock-on. This therefore represents a convenient way to update a Rock-on if desired (see below).
Force uninstall of a Rock-on
In the event the uninstallation process of a Rock-on is not possible, we provide a script to force the deletion of a Rock-on. While we do not yet have this tool integrated into Rockstor’s web-UI, it can easily be used from the command line as follows. Running this script (as the ‘root’ user) without argument will detail its usage:
Rockstor versions 4.5.4-0 and newer
cd /opt/rockstor
poetry run delete-rockon
Delete metadata, containers and images of a Rock-on
    Usage: delete-rockon <rockon name>
Older Rockstor versions
/opt/rockstor/bin/delete-rockon
Delete metadata, containers and images of a Rock-on
    Usage: /opt/rockstor/bin/delete-rockon <rockon name>
Note that the rockon name refers to the name of the Rock-on as it is
displayed in the list of available Rock-ons in Rockstor’s web-UI. As the
Rock-on name is case-sensitive, and can contain spaces, we recommend wrapping it in quotes.
For the Rock-on named Emby server, for instance, the commands would be:
cd /opt/rockstor
poetry run delete-rockon "Emby server"
This example is for newer Rockstor versions.
Updating a Rock-on
Updating a Rock-on implies updating its underlying Docker image(s). Given Docker images are designed to be ephemeral, updating a Rock-on can simply be achieved by pulling the latest Docker image, removing the currently used image, and then re-creating the container(s) using the newly-pulled image(s). In Rockstor, this can all be achieved through the web-UI as follows:
Stop the Rock-on
Uninstall the Rock-on
Re-install the Rock-on using the same Shares and settings as before
Upon re-install, Docker will check if a newer version of the image exists and download it if it does. The newly-installed Rock-on will thus use the latest image available while keeping the same data Shares, ensuring the latter will remain intact. If you re-used the same Shares for the Rock-on as before its uninstallation, you should thus be back in the same state as before, but with the latest Docker image available.
Note, however, that some Rock-ons use pinned versions for their underlying image(s); these therefore cannot be updated. These include the PostgreSQL 9.5, PostgreSQL 10.6, and YouTrack official Rock-ons.
Note
Although some of the applications inside Rock-ons have an “Update” in their own user interface, it is generally not functional due to the nature of Docker containers. It is therefore always recommended to follow the procedure described above to update a Rock-on.
There are very few exceptions to this rule, however, so make sure to have a look at the “more info” window for each Rock-on (if present) for instructions!
